
Romancing the Stones reuses the basic framework of the original KQ2 and some of the characters, but makes many changes in the puzzles. Thus, this walkthrough will not work for the original. See this page instead if that's what you're after.
Possum and the Ugly Duckling
Walk east towards land. Walk down into the ocean, then swim out to the end of the pier. Get the net and return to land. Back on the beach, go north one screen and pick up the picket. Go north one screen, then east one screen. Catch the baby bird with the net. Go north one screen and west one screen. Talk to Possum. (If she's not there, leave and re-enter the screen until she appears.) Take note of what she says about getting through the swamp, and about her grandma's dreams and blue light. From the meadow, go west one screen and look under the log. Examine the clam to get a pearl. Go east two screens, north one, and east one. Release the baby bird into the lake, and pick up the feather that's left behind. While you're here, take a reed from the clump on the southwest shore. Return west, south two screens, then east one. Pick a lemon from the tree. Go north one screen and see if you find Possum's basket. Go south two screens. Look in the log and get the earrings. Go east one screen. At the right of the screen you will see something glinting on the ground, and at the very top right corner, a rope in a tree. Use your sword on the coins to cut the rope of the trap, and then take the gold. Oops, guess it's only fools' gold.
For Your Amusement:
Keep swimming west (or any other direction) for several screens.
From the pier, go as far north along the beach as you can, and talk to the hill.
In the screen west of the swan lake, talk to the log and the stump.
At the swan lake, talk to the rocks.
On the trap screen, click the hand on the ground.
The Pumpkin Mother
Go north three screens to a pumpkin patch. Try to pick a pumpkin. Talk to the mother pumpkin until she has nothing more to say. Go south, east, and north. Look at the tree and get the mallet from the hole. Go north once more. Click the hand on the haystack, then talk to whatever's inside of it. Continue north into town. Talk to the merchant that was fishing something out of the fountain -- notice that he seems to be in custody of the missing baby pumpkin! Look at the small door next to the main library door. Use your sword or the picket to get the letter from under the door. Open it to get the library card. Go inside the library. Talk to the librarian. Wait until she looks away from you, then use the pen on the desk to write your name on the card, and show the card to the librarian. Talk to her again and she will fetch a book for you. Read it, then leave.
Throw the fools' gold coins into the fountain, then talk to the merchant. While he fishes the coins out of the fountain, take the baby pumpkin. Leave town, go south to the sign, then west one screen and north one screen. Give the baby pumpkin to the mama pumpkin. After she gives you the brooch, talk to her again and she will tell you that her baby needs bitter water. Go south four screens (if you see Possum's basket here, pick it up), then east one screen. Fill the pumpkin's bowl with water, then squeeze the lemon into it. Retrace your steps to the pumpkin patch and pour the water onto the pumpkin. The mama pumpkin will give you a candle. Talk to her twice more and she will give you a little information about Hagatha, and then turn back into a plain pumpkin.
For Your Amusement:
Click the hand on the rocks at the base of the "mallet" tree.
Talk to the gate pillars at the entrance to Kolyma.
Try to go to the northern or eastern parts of town four times in a row.
There's a lot you can do in the Library: Talk to the bookshelves. Look all the bookshelves multiple times (10-15 times). Talk to the grandfather clock. Look on top of the card catalog (file cabinet) multiple times. Click the hand on the piles of books, and talk to them.
Use the mallet on the pumpkins.
Finding the Door of Destiny
Go three screens south, then two screens east until you come to a bridge. (You may find Possum's basket on the screen before the bridge.) Cross the bridge, approach the rock face and it will turn into… well… a rock face. Talk to it. When all is said and done, go back across the bridge. Pick up the flyer and read it. Go west one more screen, then north into town. Talk to the merchant. Give the pearl to him in trade for the comb. Stop in at the library and talk to the librarian again. Read the book she gives you to find out some interesting stuff about mer-people -- which is just who you're about to meet.
The Water (Birth) Gem
Leave town, go south four screens, then all the way west to the beach. Offer the comb to the mermaid. She will give you an opal necklace and a kiss, and soon you will find yourself underwater. Ride the seahorse and you will find yourself in Neptune's court. Talk to King Neptune. After you have agreed to retrieve the Trident, leave the court at the bottom of the screen and you will be escorted to the border of the Sharkees' kingdom. Ignore the normal sharks you come across in this area - they will not hurt you. Go one screen north and one west. Ride up close to the shipwreck and examine it. You will find a bottle with a cloth inside it. Take the cloth out of the bottle. Go south one screen, west two screens, and north one screen. Ride up to the plant and take some of it. Put the grass in the bottle. Click the bottle-with-grass on the fish to trap some of them inside, making a curious sort of lantern. Go south three screens, west one screen, south one screen, and west two more screens. Note the fish that seems to be passing right through a rock wall. Touch the wall and you will find that it is an illusion! 
Go west through the wall, then two more screens. You will turn around; proceed east two screens. On the right side of the last screen, your lantern will reveal a large shell on the north wall of the tunnel. Use your sword to pry it open. (This would be a good point to save the game.) Swim north to the Sharkee king's court. Watch as he fumes over the fact that the trident will not work for him, and take note of the shells he taps on the archway. After the king and two of the guards leave, click the hand on the seahorse to make him distract the guards. Quickly swim over to the archway and press the shells in the correct order (A B B C). Get the trident and leave as fast as you can. (This is another good point to save the game.)
Mount the seahorse and you will begin to play an arcade sequence where you dodge rocks as you try to escape the sentries. Look out for the flashing arrows - those are upcoming rocks. When you come out the other end, use the trident on the illusory wall. (CRASH!) Go east three screens and use the trident on the guard. Continue east until you hit the cliffs, then go north three screens and up the slope to the east. You will arrive back at Neptune's palace and a celebration will be held in your honor. Afterwards, pay attention to what Neptune tells you, and then you will return to land.
For Your Amusement:
Talk to the seaweed which is visible in various places (such as the shipwreck).
Talk to one of the normal fish (not sharks) which are on various screens.
The Air (Growth) Gem
Go east four screens and north four screens to the town gate. Use the cloth on the haystack. Pick up the silver needle that is sneezed out. Enter the town and go back into the library. Talk to the librarian and she will fetch another book for you; read it to find out some interesting backstory on your own kingdom. Leave the library and go into the antique shop. Talk to the shopkeeper. Leave town, go south to the sign, then west four screens to the meadow where you met Possum. (You may find her basket on the second screen west of the sign.) Go north one screen to Hagatha's cave. Look at each of the skulls on the posts. Put the Birth Gem in the eye of the empty skull, then hammer it in with the mallet. Turn both the skulls. (This would be a good place to save the game.)
Enter the cave. Move quickly in here and keep as far away from Hagatha as you can. Examine the cloak and take the key and ring from its pocket. Put the cloth over the birdcage. Unlock the chain with the key. Take the birdcage and get the heck outta Dodge. (If you hang around a bit, you will hear her begin chanting over the youth potion, but you don't have much time to escape once she does this.) Once safely outside, remove the cloth from the birdcage. Look at the birdcage and read the letter you find. Use the mallet on the skull to break it and retrieve the gem. Go south one screen, east to the sign, and north into town.
Stop in at the library and read another book, one which will give you some insight into the general plot of the game. Enter the antique store and give the nightingale to the shopkeeper. Take the lamp after she exits, and rub it. Not as much as you were hoping for, eh? Examine the statue of a man at the bottom right corner of the screen. Flip the latch and go down into the basement. Read the letter on the table. Take the carpet from the shelves on the left side of the screen. Listen while Hagatha and Angelina argue upstairs, then fish the youth potion out of the pile of dust that it fell in. Go back upstairs, flip the latch again to close the trapdoor, and quickly leave the shop.
Go south to the sign and west to the meadow. Return Possum's basket to her. (If you haven't found it yet, the only place it can be is two screens north and one screen west of here.) Use the carpet. Go east one screen and use the opal necklace on the snake. Quickly walk past the snake, and on the next screen, continue into the cave. Look at the workbench. Read the book. Put the yellow flower and brooch (or earrings) in the beaker. Strike the stone with the mallet to light the wick. Add the swan's feather. Use the picket on your sword to pry out the crystal, and add that to the beaker. Click the talk icon on the beaker to speak the incantation. Take the emerald. At the bottom right of the screen, near a scroll that is fastened to the wall, is an inscription. Read it, then exit the cave.
Use the carpet again and you will be returned to the sign. Go west three screens. Use the emerald on the fifth-from-the-left of the smaller stones at the base of the big one. Take the bridle. Return east to the sign and use the carpet again. When you get to the cliff top, it will vanish. Go east one screen and hypnotize the snake again. Quickly walk just past it and then use the emerald on it to break the enchantment laid on it. Talk to the winged horse. When you have nothing more to say, put the bridle on it, then mount up. You will fly into the clouds and be tested by the Cloud Spirit. For the first test, talk to King Edward, then pick "Sacrifical Lamb" (compassion). For the second, talk to the Father, then pick "Severing the Lifeline" (honor). For the third, the correct answer is "Knight Time" (loyalty). After the tests are over, take the gem from the mouth of the Cloud Spirit, and quickly remount the horse. By the time you are on the ground again, it will be night.
For Your Amusement:
Examine all the items in the antique shop.
Outside Hagatha's cave, talk to both the skulls.
Talk to the foliage near the rock arch.
Repeatedly leave and re-enter the screen with the cave.
In the screen west of Hagatha's cave, talk to the rocks jutting out from the sea.
Talk to the carpet before taking it.
Hang around in the shop and wait for Hagatha to come back.
Talk to the sky.
Talk to the snake.
Just outside the enchanter's cave, Click the hand on the hole in the rock.
Hang around in the enchanter's cave after creating the emerald. (This may take a while if you were quick about it.)
Click the hand icon on the Father during the second test. (The meaning of this will become apparent at the end of the game.)
Try all the various test answers. (Save the game right before talking to the other character.)
In the third test, select "The Madness of King Graham". (You must pick correct answers in the first two tests to be able to do so.)
The Earth (Death) Gem
Go east one screen and enter the church. Look around a bit, then click the hand on the altar to pray. Talk to the monk until he starts to pray again. Wear the cross. Pick up the book that is sitting on one of the pews and read it. Pick up the page that falls and note the first letter of each word -- they are directions. Leave the church and go west, then watch the cut scene with the wolves. Go south to the spring and then west one screen. Talk to Possum and she will tell you she was robbed by a dwarf. Go back east, north two screens, then west. You will observe the dwarf leaving his house. After he leaves the screen, go inside the house, down the ladder, and east into the house proper. Grab the chicken soup from the fire and open the chest at the right side of the screen. Close the chest again and quickly leave the house. Go west two screens and south one to the cottage. Open the mailbox. Enter the cottage, put the soup on the fire for a moment to reheat it, then give it to Grandma. When she is finished, talk to her. Get the cloak and ring from under the bed and continue to talk to her. After she falls asleep, wear the cloak and ring, then leave the cottage. Watch the cut scene.
Go west to the beach, then north four screens (straight past Hagatha's cave; don't dodge west to keep on the beach) to the edge of the swamp, then east. Use the needle on the poisoned water, then use the poisoned needle on the reed to make a handy-dandy blowgun. From here, follow the directions from your Bible page (the first step will always be south). Eventually you should be able to see the castle in the distance to the north. Go there and speak with the boatman. When finished, pay the boatman the coins you picked up from the dwarf. When he ferries you across to the other side, eat the sugar cube, then click the walk icon at the far end of the path. You will automatically walk there. At the castle, approach the doors. The ghosts, mistaking you for the Count himself, will float away. Use the crucifix on the door lock, then open the door.
Go down the hallway into the library and light your candle from one of the candelabras. Return to the entrance hall and go up the stairs to the right tower. Continue past the dining room through the door on the opposite side of the screen. Go down the stairs and west into the crypt. Click the cloak on yourself to remove it. Open the coffin and look inside. The Count will appear. Talk to him. Walk towards him. After he pins you up against the wall, click the ring on him. After he is finished and has left, look in the coffin again. Move the pillow to find the Death Gem. Take it, then leave the crypt and return to the entrance hall. Try to leave the castle and you will notice the doors are locked. Go up the left stairs. (This scene should look -- ahem -- hauntingly familiar to players of KQ4.) Take the shovel and continue upwards. Look out of the window, and then climb out. Proceed downward, but there's nothing you can do to avoid the fall.
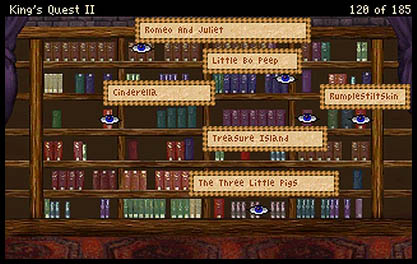 You will come round again at the dinner table, and the Count will lay out his task for you. Talk to him, then to the Countess, then to the Count again. Take the leg of ham from the table (between the middle and right-hand chairs). Go down the stairs and into the library. Talk to the young woman you find here until she has nothing more to say. Examine the book she gives you and you will find a key. Examine the black book again and take note of the stories being referred to: Cinderella, the Three Little Pigs, Little Bo-Peep, Rumplestiltskin, Romeo & Juliet, and Treasure Island. Click the hand on the fiction section at the back of the room and then switch to the eye icon. Skim over the bookshelves and push the books in the correct order (see picture at left). Take the book which appears on the third shelf. Use the child-shaped key on it, and examine it. Sounds like maybe 1200 is meant, hmm? As you leave the library, Anastasia will give you a bracelet to place on her mother's grave.
Leave the castle and go west to the graveyard. Be careful not to touch the ghosts. Show the bracelet to the ghosts, then put it on Lady Lillian's grave (right at the front; read the gravestones). Take the ring that they leave behind. Read the gravestones until you find Count Eveer's (top left center). Dig with the shovel by clicking it on the gravestone. Click your hand on the hole, then search the items in the grave to find and read a parchment. Leave the graveyard, walk down the path, and get back in the boat. Go south from this screen, then the reverse of the last step you took to enter the swamp. You will automatically arrive back at the entrance to the swamp (one screen north of Hagatha's cave).
Go south four screens, then east. Enter the cottage. (If there is a werewolf in bed, get out of there!) Look under the pillow and get the wolfbane. Leave the cottage. Go east three screens, north two, and east to the church. Go inside. Read the book on the altar, then continue south into the graveyard. Find Larmon Odnarb's grave (at the back right) and dig it up. Open the chest inside and take the tiara. Leave the church and go west to the sign. (Save the game.) Try to go west. Use the wolfbane on yourself to repel the wolves. Continue west to the meadow, north twice, and east to the swamp. Again follow the bible directions. When you get to the screen where the boatman should be, you will be ambushed again by more wolves. Quickly use the "blow-gun" on the head werewolf, and shortly after, the boatman will appear to ferry you across the lake.
For Your Amusement:
Click the hand on the church bell.
In the dwarf's house, click the hand on the large pot on the shelf above the fire.
Look at the chandeliers in the entrance hall of the castle. Hmm, haven't you seen these somewhere before? (Or is it, "won't you see these somewhere later"?)
Click the hand on the barrels in the entrance hall.
Talk to a candelabra.
Try to ward off the Count with the crucifix.
Show the child-shaped key to Anastasia.
Push a wrong book, or push one out of sequence.
Read all the gravestones. One mentions Olga and Boris from QFG4, and next to this one is one with a changing message. (At random, it references Sierra Online, Anna and the King of Siam/The King and I, Arnold Schwarzenegger, The Sound of Music, Crocodile Dundee, Lethal Weapon, The War of the Roses, Star Wars, Blackadder, or Elvis.)
Dig up an incorrect grave.
Read all the gravestones.
Through the Door of Destiny
After you have the Death Gem back in your possession, talk to the Count one last time, then leave the castle and return across the lake. Watch the cut scene. Leave the swamp, go south two screens and east to the sign. Enter town and read the fifth (and last) book the librarian gives you. Then go south four screens from town and east to the bridge. (Save the game.) As you cross the bridge, you will fall into a trap. After the dwarf threatens to cut the ropes, quickly bundle the gems in the cloth and throw it to the eastern side of the chasm. Talk to the dwarf and he will throw you his knife. Cut the rope that is next to your trapped leg. Click the hand just above yourself and you will climb up the fallen bridge. You will pick up your gems from the ground and head east to the Door. Unwrap the gems, then put the gems in the holes, in order (Birth, Growth, Death). Choose the Tower Realm.
Notice the golden fish that is jumping in and out of the water. Fish with the net until you catch it (it may take quite a few tries), pick it up, and throw it back into the sea. Climb down into the water and ride the fish. Go east two screens from where you come ashore, and notice the differently coloured patch of sand. Stand there, then read the writing that appears, and click the words with the hand. You will be transported to the small island you can see in the distance. Pick up the stone. Stand on the patch of sand you can see on the left of the island, and look at the drawing. Climb the tallest palm tree by clicking first the hand, then the walk icon on it, and get a coconut. Climb back down the tree. Cut the coconut open with your sword, fill it with water from the sea, and then pour the water on those words. A second portal will open - this is your escape.
Stand on the first portal again, then go one screen west, and one north to the tower. Put the gold ring (not the wedding ring, but the one from Hagatha's cave) in the outer ring of the door, then look at it. Put the stone in the center hollow. Talk to each of the statues. The right one is the right one, so click the hand on the door, and press Cloud, Sun, Rain, and Mountain. Climb the stairs to the top. Use the emerald on the lion, then pick up the tuft of cat hair that's left behind and combine it with the youth potion. Unbar and open the door. Kiss Valanice. Hmm, not quite a fairy tale, eh? Use the emerald on her. Not enough light? Push the vanity towards the window, then adjust the mirror so it reflects light into the room. Now use the emerald on Valanice, and now kiss her! After Hagatha appears, quickly toss her the youth potion, and watch the fun. While she's checking out the damage in the mirror, adjust it so that it blinds her and she falls out of the window. Talk to Valanice. When you are transported to Hagatha's cave, pick up the "snowglobe" that is on the table behind you. Walk out of the cave, and watch the ending movie.
For Your Amusement:
Put the gems into the Door in the wrong order (try both Growth first and Death first).
Try all the other realms at the Door.
When you arrive in the Tower Realm, talk to the cliffs.
Stand on the "escape" portal before rescuing Valanice.
For Your Amusement at various times:
Talk to yourself. Occasionally, you will hear a KQV reference.
Click the eye and hand on various bits of the scenery in every screen. Some of the generic messages are quite amusing.
Use all the game objects on yourself.
Last updated: 9/02/2024