Note: This walkthrough isn't thorough about looking at absolutely everything and choosing every dialogue option in every conversation; it just describes important actions and dialogue choices needed to solve puzzles and advance the plot. That said, it doesn't always take the most efficient path between locations, and there are some not-strictly-necessary actions taken for context. Future versions will include some of the more easily overlooked amusements and notable Easter eggs, but generally speaking, you're on your own if you want to dig deeper into all the many jokes and things to see.
Act I: Things to Do on Mêlée Island When You're Dead
Mêlée Island
Talk to the catapult operator, Tony, to learn that he's allowed a snack break. Go to the Scumm Bar. Talk to the bartender. Talk to the drunk guy across the room (with the bowl of pretzels and balloon). Hmm, no go. Talk to the dart players. Say, "Why are there so many holes in the walls around the dartboard?" and then "I bet you can't hit that balloon over there." But they will. The startled drunk will collapse (eh... maybe he's just passed out?), and now you can take his pretzels. Go to the harbor. Get the popped inner tube. Return to the mansion. Put the inner tube on the Y-shaped cactus near the mansion. Give the pretzels to Tony. While he's gone, tinker with the catapult controls.
Now that you've bought some time, you need to get on your way to Lucre Island for that restraining order. Talk to Carla and Otis, who are standing near the Mêlée town hall. Doesn't sound like they're too eager to join you without a little quid pro quo. Go into the Scumm Bar. Talk to the man sitting near the window. Ask Cheese to join your crew, then if there's something you could do to convince him to join. Beat him at insult arm wrestling. (It's not hard, although sometimes the Random Number God isn't on your side as far as Cheese's responses and it can stretch out a bit.)
Go back to the municipal harbor. Talk to the harbor mistress. You'll find you have difficulty persuading her to give you a ship. Return to the mansion. Walk over to the desk by the window and pick up the government paper. Talk to Elaine. Tell her you're having trouble getting a ship because you don't have the proper authority. She'll give you the gubernatorial symbol of Mêlée Island. Give her the cushy government contract to sign. GO give the contract to Carla. Show the gubernatorial symbol to the harbor mistress and you'll be issued a ship. Your crew and navigator will arrive, and it's off to Lucre Island.
Lucre Island
Go to the law office. Talk to the lawyers. Read the letter they give you. Go to the bank next door. (Notice that when Ozzie gets mad, he breaks his walking stick.) Talk to the teller. Tell her you'd like to retrieve items from your safe deposit box. (If you don't get this dialogue option, you didn't read the letter. You can't show Brittany the letter; you have to read it yourself.) Watch the cutscene.
When it's over and you're locked in the vault, get the sword and the two sponges. Look in the safe deposit box and you will get a music box and bottle of grog. Get the handkerchief, then pick up the sponge underneath it. Use the sword on the bottom hinge of the vault door. Put the small sponge, then the medium sponge, then the large sponge in the crack. Pour the grog on the sponges. Watch the cutscene. You now have yourself a fetching little voodoo anklet that prevents you from leaving Lucre Island. Get the tin of chicken grease from the floor near the iron maiden. Talk to Otis, if you like. Leave the Hall of Justice.
Go to the screen with the bank and law office. Use the sword to pry up the manhole cover. Look at the cover and note the three names on it. Go to the Palace of Prostheses. Talk to Deadeye Dave and you'll learn that he can identify people by smell. Tell him you're looking for a no-nosed pirate thief, but you don't know his name to look him up in Dave's filing system, and Dave will tell you that he's lost the monkey that knew how it worked, anyway. Ask him for a free prosthesis. Choose the names that were written on the manhole cover: first the scratched-out man's name, then the woman's, then the other man's name. You'll get some prosthetic skin. Try giving Dave Pegnose Pete's handkerchief, but you'll find that the smell isn't strong enough for him to smell through his stuffed-up nose. (Believe it or not, you're going to be indulging in a bit of custom perfumery to recreate this smell.) Play the music box for Dave. While it's playing, quickly go over to the bin of prosthetic arms and take the redwood arm.
Leave and go back to the manhole. Put the skin over it. Bounce up into the open bank window. Pull the pull-chain to turn on the light. Get the ScupperWare from the table at the left. Climb up the ladder and walk around to the shadow that's being cast on the wall. Look at the funny shadow. You'll automatically pick up the nose, but Canard will arrive and take it from you. Now that you've found one piece of evidence, you'll see a cutscene. Leave the bank.
Go to the perfumer's stand, Scents and Sensibilities. Talk to the "annoying perfume pusher", Hugo. Get one of the empty bottles from the pile on his right and take the cologne from the stand. Go to the House of Sticks. Notice that Ozzie had Freddie make him another walking stick, which he picks up from a rack. Get the pile of cedar shavings from the floor. (You can indulge in talking with Freddie about walking sticks if you like, but it doesn't accomplish anything.)
Go to the fountain. Put some water in the empty perfume bottle. Put the cedar shavings in the bottle. Go to the bait shop. Get the duck that's sitting outside. Go inside. Get some free bait. Put it in the ScupperWare. Use the home-made perfume on the bait bin to collect some of the bait-scented liquid. Use the redwood arm on the termite circus. Go to the Marshe. Get some swamp water in the perfume bottle. Go to Ozzie's mansion. Pick the flower that's near the fountain and put it in the perfume.
Go back to the Palace of Prostheses. Spray your Eau de Pegnose perfume for Dave. Note the name he tells you. Twiddle with the file retrieval system controls. Turn the dials to match the first letter of the first name, the middle initial, and the first letter of the last name.
A-D - Bunny
E-H - Tree
I-M - Pumpkin
N-S - Monkey
T-Z - Banana
You'll receive Pegnose's prescription with accompanying directions to his house. You may want to copy down the times and compass directions onto a piece of scratch paper so you don't have to keep opening and closing your inventory while you're navigating the Marshe.
Go to the docks and pass the Port Authority building to find a couple of chess players. Talk to the portly chess player. Say "Your friend seems awfully focused on the game." Then choose the dialogue option that has to do with food to distract him. (*sigh*... Fat jokes.) Talk to the skinny chess player. Distract him by choosing the option about Brittany. As they start fighting, pick up the clock. (Save the game here, as animations in the Mysts O' Tyme Marshe can sometimes be buggy; you may get stuck getting on and off the raft or taking the pole in and out of the swamp.)
Go to the Marshe. Put the clock on the raft. Look at the time on the clock and look up the corresponding direction in your notes. Start following the directions through the Marshe in this way. After three correct moves, you will encounter a wrought-iron fence and gate. Another you will come into view on the other side, saying "Hey, Guybrush, I need your help! Here, take this," and giving you a skeleton key.
You'll be given a dialogue choice. You can say whatever you like, but make note of his response. Then he will give you two items; make note of what they are, and in what order. Talk to the other Guybrush. Make note of the number he says you are thinking. Use the skeleton key on the gate. After he passes through, he'll give you one more item. Move up just through the gate.
Continue following the directions. After three more correct moves, you'll find you have become the "older" self who was on the far side of the fence before. Give your "younger" self the skeleton key. When your younger self speaks the line you chose before, choose the response the older self said before. Give your younger self the two items you were previously given, in the same order. Your younger self will ask you what number he is thinking of; give the correct answer. He will open the gate. You will automatically give him the third item. He'll move out of the way and let you pass.
Keep following the directions. One more correct move will take you to Pegnose's house. Walk up to the house, then go stand by the window. You will automatically eavesdrop and learn how Ozzie and Pegnose are in cahoots. After Ozzie leaves, pour the chicken grease on the doormat. Throw the duck into the open window and enjoy Pegnose getting captured.
But you're not cleared yet: you still need to recover the stolen items and prove that Pegnose handled them. Go to Ozzie's mansion. Spray cologne on one of his various stuffed animals to piss him off. He'll break a walking stick and, blaming you, go off to have a new one made. Go to the House of Sticks. Use the arm with termites on Ozzie's new walking stick. (Notice that he now leaves a trail of sawdust when he walks.)
Go to Ozzie's mansion again. Talk to him. Bluff about knowing where the Booty Showcase is. Follow Ozzie through the forest. After a little cutscene, you'll be on a little piece of land sticking out into the lake behind Ozzie's mansion. Walk around behind the hill until you find the secret passage Ozzie used (this can be a bit tricky, since you can't really see what you're doing). Press the button on the edge of the table. Look at the revealed loot through the window. Climb back up the ladder. Dive into the water where it's darker blue and deeper.
When you touch the bottom, get out the ScupperWare with bait in it. Wait until some glowing fish swim near you and then open the ScupperWare. Go west through the opening you can now see. Get the stolen heirlooms. As you pick up the chest, a tiny screw will fall out. Walk back into the water the way you came, swim up, and return to Lucre Town. Go to the Hall of Justice. Give the screw to Canard. Watch the cutscene.
Act II: Enter the Manatee
Mêlée Island
When you're done talking to Elaine, go visit the Voodoo Lady's shop in Mêlée town, as she suggested you do. Pull the forefinger of the hand-shaped table (?). Talk to the Voodoo Lady. You'll learn about the Ultimate Insult and get a few objects from the chest of heirlooms.
Go to Meathook's House of Wax, which is now open. Talk to him. One of the things you can learn is that he once painted a map for H.T. Marley to give as a wedding present, but since he started going over his old watercolors with wax, he doesn't know what happened to it. When you're done, take a paint brush from the bucket he brought out. Go to the harbor. Look at the change return slot in the grog machine. Get the quarter and use it in the grog machine. Punch and kick it until it dumps out a whole pile of cans of grog. Take one.
Go to the Scumm Bar -- uh, make that the Lua Bar. Sit on the middle stool at the sushi bar. Look at the "decorative art" on the wall. Talk to the waitress. Ask if they have anything cooked. Order the flaming scuttlefish. Get the paintbrush out of your inventory. In a few moments, a flaming boat will come down the canal. Wait while it passes you and U-turns. When it barely emerges from behind the pillar heading to the left, jam the paintbrush in the sushi boat propulsion mechanism. The chef will emerge from the kitchen. Quickly dodge around him and go into the kitchen. Pour the can of grog into the sushi boat steam generator (the thing at the bottom center that looks like a still, or a barrel with a long tube attached to the top of it). You'll receive the ruined painting. Why, that's a map just like Meathook talked about!
Go to the harbor. Give the earrings, necklace, and pen on a chain to the figurehead. Give the painting to the figurehead and she will mark Jambalaya island and draw a picture of the Ultimate Insult on the back. Carla and Otis will reappear, along with Elaine. Talk to Elaine. Then it's off to Jambalaya Island.
Jambalaya Island
Walk up the stairs and go to StarBuccaneers. From outside, look at the grogaccino cup sitting in the window. Enter and pick up the cup. Talk to Mabel, the tourist. Ask her about the Ultimate Insult and ask about the golden man component. Take her shopping bag to get her souvenir mug. Give the empty grogaccino cup to the barista to get a free "refill". Take a sample of the Schmear Whiz™ and eat it (or try, anyway).
Go to Stan's Timeshare Emporium. Get the bottle of glue that is sitting on the ledge to the left of the building entrance. Take a brochure from the blue bin on the right of Stan's desk. Drink the grogaccino. Talk to Stan and agree to listen to his sales pitch. Since the grogaccino lets you stay awake through the whole thing, you'll get a coupon for a Mega Monkey Meal at Planet Threepwood. (There's two ways to get a coupon, and you don't have to do both; see the next paragraph.)
Go to the Microgroggery. Talk to the bartender. Order a drink. Since you don't have any ID, you'll only be able to get some Grog Jr.™ (wimpy grog). Here's option 2 for getting a coupon: ask the bartender about the "thing over there with a saddle on it". Put the glue on the manatee, then ride the manatee. Since you can stick it out (...sorry not sorry), you'll get a coupon.
Go to Planet Threepwood. Talk to Murray to get this game's slightly dodgy explanation of what happened at the end of Curse and how LeChuck got out of it. (To be fair, Curse's explanation of what happened at the end of Revenge is similarly slightly dodgy. So it goes...) Go inside. Read the menu board. Talk to Clive, the tourist near the giant statue of Elaine. Ask him about the Ultimate Insult and the silver head component.
Talk to the waitress. Order food and a drink (choose whatever you like). Give her the coupon. In a moment she'll come back with the silver mug. While still seated, talk to the jolly pirate. Answer however you like and he'll draw a caricature of you with the mug. (I'm not sure how you're supposed to get this one. Nothing hints that he'll draw objects that don't have to do with his questions, especially not if you got a regular caricature first, as most players probably do while experimenting. Personally, I spent a lot of time trying to figure out some way to paint the StarBuccaneers mug silver. If this were a Sierra game with a score, I'd have expected that to be an alternate solution for fewer points.) Use the glue with the caricature, then use the caricature with the StarBuccaneers mug. Swap the fake mug for the real one.
Go out to the statue in the plaza. Look at the statue and the plaque. Talk to Monty, the tourist. Ask him about the Ultimate Insult and the bronze hat. Ask him what he's doing and what happened to the top of the statue.
Go to the docks. Use the community rowboat. Row past the ship that's between the two islands. Talk to Admiral Casaba. When finished, head on to Knuttin Atoll.
Knuttin Atoll
Approach the puppet theater. Talk to Li'l LeChuck. Say "If you're Hellbeard, where have you been for the past 80 years?" Talk to Li'l Guybrush. Ask to talk to the puppeteer. When finished, notice that Hellbeard doesn't duck back down behind the theater. Show him the drawing of the Ultimate Insult. He'll freak out and bolt, leaving the puppets behind. Get the puppets.
Go to the schoolhouse. Talk to the teacher. Say "I'm tired of being a slimy pirate. Sign me up." Watch the cutscene. During the exam, give the worst and most violent possible answers. You'll flunk, receive a dunce cap, and get kicked out. Pull the fire alarm. When Miss Rivers runs out screaming, quickly go inside, walk up to the chest of confiscated items in the bottom left corner, and get the whistle. Blow it: it's not a whistle at all, but a parrot call.
Leave the school and go west past the puppet theater. (Save; the game can get buggy here.) Talk to Jumbeaux LaFeet. Ask about the parrots and what's special about them. Then say, "You're awfully large" then "I'd like to talk some more about your father." Go through the dialogue that questions what you were told about Tiny LaFeet by the tourist by the statue. (If you don't have that dialogue option, go back to Jambalaya and talk to Monty again.) Ask about the hat and if you can borrow it. Exit out of the conversation. (I recommend not talking to the parrots themselves just yet; if you ask a truth-determining question now, you may not be able to trigger it on the next screen when you need it.)
Go east onto the boulder beach. Blow the parrot call. Give the wimpy grog to one of the parrots. Talk to a parrot and ask it the truth-test question in the list - e.g. "What's my name?" or "Two Plus Two?" (If you say "Pretty Polly" or "LeChuck sucks!", they just repeat it back to you.) Make sure you say "Ah, that must be the truth telling/lying parrot" afterwards. If you couldn't even ask the test question, reload and try again.
To save yourself some time, don't start asking the parrots where to go just yet. Instead, walk east a ways down the beach, at least 5-6 screens (the beach is 12 boulders long). Now call the parrots, then put away the call. Ask the truth-telling parrot which way to go. Walk that direction. Repeat. When the parrot replies that you should go "Nowhere!", you've found it. You should say "Tiny LaFeet's hat must be buried under THIS ROCK!" If he doesn't, the game won't let you proceed, so reload and try again.
The camera will flip viewpoints so you are seen behind the rock. Take out the puppets. Enjoy the puppet show, but it seems that Casaba doesn't. When the action is over, get in the rowboat and return to Jambalaya Island.
Jambalaya Island
Go to the "tall rock" (diving area). Talk to Marco de Pollo. (Ask him how he got into plank diving if you want some explanation for what happens at the end of this sequence.) Walk along the wooden walkway to the left. Talk to the judges and tell them you want to win the trophy. After a short scene they'll issue you a diving certificate. Show the certificate to Marco. This first time you dive, you won't succeed (or at least it would be unlikely to do so by random chance), so just press whatever arrow keys you like.
Talk to each of the judges individually and ask what was wrong with your dive. Make note of the moves the hippie judge, Judge Tripps, tells you about. Look at the timeshare brochure you got from Stan's. Show the brochure to the grumpy judge, Judge Edd. Walk back to where Marco is. Put the Schmear Whiz™ in the seal oil. Talk to Marco and challenge him again. Make note of his diving moves and which arrow keys to press to copy them. When you're up on top of the rock, wear the dunce cap. Carefully walk out onto the diving board. (If you're using the keyboard, there's a spot where you will start to walk automatically. Make sure you release whatever key you're pressing when he does this, or the game will take it as diving input.) Enter the three correct moves. Amazing! You're tied with the champ!
You will now go first. Perform any moves you like. Before his final dive, Marco will apply the adulterated seal oil to himself, attracting seagulls and causing him to fail the dive. You'll get the diving trophy. Watch the cutscene.
Act III: Escape from Monkey Island™
Monkey Island
Look at the note. Walk off the beach to the south. Go to the cluttered clearing. Get the coconut lying on the ground near the hammock. Read the note. Go west. Talk to Herman. Ask him what is the earliest thing he remembers. Exit the conversation. Throw the coconut at him. (Now he remembers that he's Herman.) Talk to him again. Ask him what now is the earliest thing he remembers to learn he was hit with a milk bottle.
Go to the canyon. Get the banana picker that's resting against a cactus at the bottom right. Return to the beach. Get the bananas from the tree with the banana picker. Give a banana to Timmy. He'll now follow you. Return to the mine. (If you accidentally walk through Herman's camp, give Timmy another banana and he'll keep following.) Give Timmy a banana and walk into the mine. Walk all the way to the back. Open the vent. Put a banana in the vent; Timmy will go inside. Close the vent. Put a banana in the portal. Timmy will work a mechanism inside and open the door. Walk into the next room. Holy mecharoni! Use the banana picker to get the weed whipper. There's nothing else you can do here right now besides look at stuff. Leave the mine.
Go to the lookout point. Stand behind the pile of rocks and pick up a rock. Throw the rock at the canal on the right. Immediately pick up another rock, and watch the first rock you threw. When it passes a root and causes it to vibrate, throw your rock at the center canal. Again, immediately pick up another rock and watch the second rock you just threw. When it, too, hits a root, throw the rock at the canal on the left. Once more, immediately pick up another rock. When the rock in the left canal hits its root, throw the third rock at the left canal again. If you timed it correctly, two of the rocks will hit each other, causing one to come out on the center ramp so that it will land in the lava field. If you don't get it right, enjoy the groovy music while you try again. (And ponder why in the hell they thought doing this as a sort of arcade game and not a narrative puzzle was a good idea.)
Once you've flung a rock to the right place, go to the volcano and enter the cathedral. Look above the doorway you just walked through. Use the banana picker to get the "shields" from the skull's eyes. Walk over the bridge across the lava and talk to Father Rasputin. Say "I'd like to try your lava plunge" and then "Aw, c'mon."
Save the game just as you emerge into the lava field. This will save you some time in resetting if you don't get it right the first time. (Again, you will have cause to ponder why this needed to be an arcade sequence.) You can't continually steer like when you're walking or running, here; you can only choose a left or right path at certain points. Also, when you hit one of the other "logs", you'll bounce back and take the other path.
Open your inventory and take out the banana picker. The bottle you want is inside the small white circle shown below:
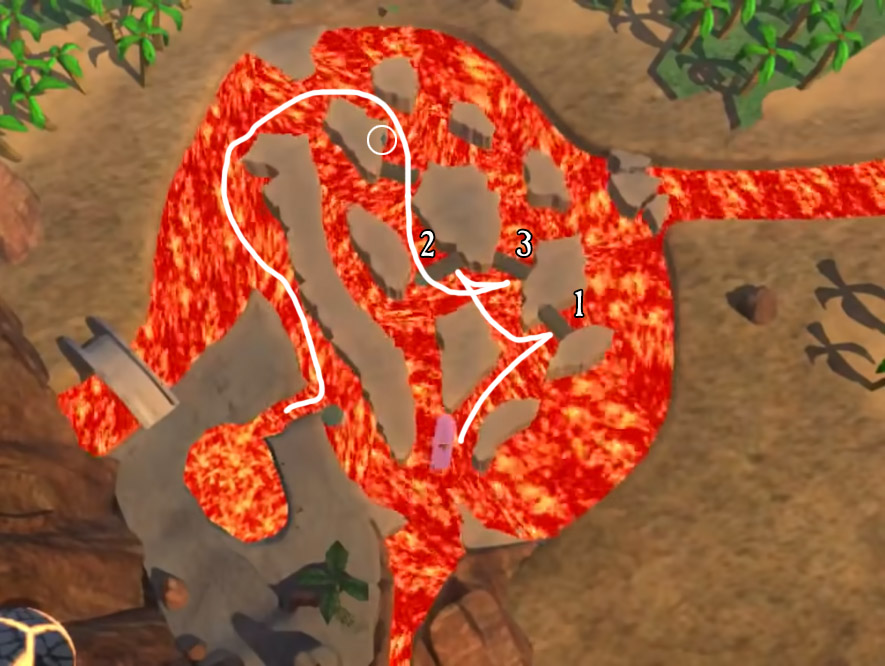
Steer towards the rightmost of the logs (#1). You'll bounce back. Steer left so that you hit the log in the very center (#2). You'll bounce back. Log #2 will hit the log that's nearest the bottle and bump it out of the way. You will hit log #3, and again bounce back, now pointed between the two rocks that log #2 started out at.
At the point of the rock where the bottle is, steer right so that you will pass close to the bottle. As you do, the view will change and an action with the banana picker will appear so you can grab it. Do so quickly, as you only have a moment.
As you pass the end of the long narrow bit of rock that's leftmost in the field, steer into its side (screen right) so that you hug it rather than being swept back into the church. The boulder you flung will give you a choice to steer right and into the small oval pool. Phew! Use the weed whipper on the weeds. Kick over the palm tree; now you can cross this whole area on foot.
Go back to the campsite. Hit Herman with the milk bottle. He should now recognize you, not continue to say "Herman? Where?" as if you hadn't even hit him with the coconut. (If he doesn't, start over with the coconut, twice. There's a quirk in the scripting here that if you've thrown other things at Herman or done it out of order, that the correct order won't register until you've "reset" the chain. Thanks to KCAdventure1 on a Monkey Island Discord server for the tip!) Talk to Herman. Again ask him what's the earliest thing he can remember to learn he was hit with an accordion.
Go to the village on the top lobe of the island. Exit the conversation with Jojo as soon as you can (don't worry, you'll be back). Look at the musical monkey. Get closer to it and use the shields (just by themselves, not with the monkey). Fascinated with your cymbals, the monkey will throw down the accordion. Go back to the campsite and hit Herman with the accordion. He should now remember everything. Watch the cutscene. Talk to Herman -- er, Horatio. You'll get another cutscene, and when it's over you'll have a copy of the Mêlée gubernatorial symbol.
Return to Monkey Town. Talk to Jojo about his hat, then ask about Monkey Kombat. The PlayStation 2 version of the game helpfully keeps track of the moves for you; in the PC version, alas, you're going to have to write it down.
A Monkey Kombat Primer
Monkey Kombat operates on the same principle as Rock, Paper, Scissors, Spock, Lizard: there are five stances, each of which defeats two others, and which is in turn defeated by the remaining two stances. Because the moves between stances go both ways, there are ten possible moves for all combinations of the five stances. You can chart this on a pentagram drawn inside a pentagon, using arrowheads to indicate the direction of what defeats what and writing the three sounds used to move between those two stances along the lines, but I find that gets a little cluttered to read (not to mention difficult to quickly find the correct spot to write a new move in). I prefer a textual table or list like this:
| Dominances | Transformations | Transformations |
|---|---|---|
|
AA: CC, GG BB: AA, DM CC: BB, DM DM: GG, AA GG: BB, CC |
AA-BB AEC AA-CC AOE AA-DM ACO AA-GG OAC BB-CC AOC |
BB-DM OCA BB-GG ACE CC-DM EAC CC-GG AEO DM-GG OAE |
(This is a real example from an actual playthrough.)
Note down the first dominance and move that Jojo Jr. tells you. Exit the conversation and leave Monkey Town. The Monkey Kombat encounters are in the little strip of forest between the town and the rest of the island.
Tips for getting through this part as quickly as possible:
- You don't need to fight all four kinds of monkeys (Timid, Smelly, Strapping, Brawny). Defeating a Timid Monkey gives you access to Strapping Monkey, and defeating a Strapping Monkey gives you access to Jojo Jr. Other than that, focus on collecting moves, not defeating all kinds of opponents.
- Jojo Jr.'s advice about "monkey see, monkey do" means that if you can copy your opponent's stance -- that is, deliberately draw -- you should do so. When you draw, you are both reset to a random stance, and your opponent is then likely (although not guaranteed) to make the move that will defeat you in that stance. Thus you may more quickly learn transformations and dominances, even though you probably wind up losing the fight. (If you're thinking of trying to bait your opponent into showing you a move from X to Y by moving to a stance that is vulnerable to Y, don't waste your time; apparently, though the monkeys' fighting script was intended to work this way, it doesn't in practice.)
- You don't need to directly witness things to be able to use them; that is, they don't need to be "unlocked". Once you know enough of the dominances, you can deduce the rest, because each has to dominate exactly two different others, has to be dominated twice and only twice, they can't be reciprocal, and no move can be dominant over itself. In the example below, the ones in red can be deduced from witnessing the others.
AA - CC, GG
BB - AA, DM
CC - BB, DM
DM - GG, AA
GG - BB, CC
(The logic is: AA has to appear in the list twice, but it can't go with itself AA, and it can't appear twice in the same place BB. Thus it has to go with DM. GG likewise has to appear twice, but BB can't dominate GG because GG dominates BB. Thus GG has to go with AA. And then the only remaining place is the second DM.) - Likewise, when you have 6 or 7 of the 10 moves between stances, you can start making educated guesses about what the remainder might be. There is a bias towards moves that start with A (in the example above, 6 of the 10), and secondly starting with O (3 of the remaining 4). Moves are always three different sounds, never two of the same. (For a more systematic approach, plus some information on why the A-moves and O-moves are most common, see this speedrunning guide.)
- When you fight Jojo, you can make the fight a lot shorter with this one weird trick (ha ha) that exploits his scripting: Foul (make illegal moves) until you have only two bananas left in your health bar. Jojo's next attack will only do one banana of damage. Respond with the correct attack for the stance he's in. This will drain his health bar down to one banana all in one go. On his next move, Jojo will draw. Make a correct attack again and you will win.
Once you have Jojo's hat, go to the giant monkey head. It's not really silver, but it is gray, right? Every pirate makes substitutions. Use the bronze hat on the monkey's head. Now what about a golden man? Hmm... have you noticed the shape of the banana picker's handle? Use the banana picker on the monkey head's nose. (I don't think this really counts as the silver head being on top of the golden man, but at this point, whatever...) Go inside the monkey's mouth. Again, holy mecharoni! That's not what was in here in The Secret of Monkey Island! Examine the controls. Remember what Herman Horatio Herman that weird guy on the beach said about the gubernatorial symbol being the secret fourth part to make an Ultimate Insult work? Put the symbol in the "prominent slot". Watch the cutscene.
Act III+: Guybrush kicks unusually large butt
Amplifier Tower
Walk to the right side of the area. Get the large plank. Use the plank on the small tower. Climb the small tower. Jump on the plank. You will automatically swing onto the medium tower and then up to the top of the large tower. If you can't figure out what to do from here, I'm afraid there's no hope for you.
...Okay, okay. Use the switch. Watch the cutscene.
Mêlée Island
If you try to fight LeChuck normally, it'll quickly become apparent that while you're not dying, you're also not getting anywhere. Remember Ozzie standing up on top of the statue, controlling LeChuck? (Hmm... has Ozzie been trained in Monkey Kombat? Or is this the Insult itself somehow taking over?) What if you could do something about him and/or the Ultimate Insult he's wielding?
When you were fighting monkeys and learning moves, did you notice that the monkeys make various gestures when you draw with them?
Did you ever draw three times in a row?
When you do that, they hit themselves on the head.
Where Ozzie is standing.
So, you should draw with LeChuck three times.
...Squish.
(Yeah, it's pretty obscure. It's quite possible to never see this hint, and even if you do see it, to not understand its meaning and make the connection you need to make. Aaaanyway...)
Watch the cutscene. You and Elaine are off to piratey adventure once more! (If someone would just rescue you from this cliff...)
Last updated: 4/13/2025