Note: This is for the regular, not Lite, version of the game. (Apologies to any magazine reviewers in the audience.) As per usual, I'm not taking the 100% most efficient route through the game; rather, there are some actions taken for context and I've put off some things until they are motivated by the narrative rather than doing them as soon as possible (e.g., not stealing Wally's monocle at the first opportunity).
Note 2, 2/16/2025: Despite the above assertion about lacking efficiency, the way I wrote this walkthrough was trying to minimize travel between the islands. Unfortunately, that also means it's missing two cutscenes, because there's one that can play each time you leave an island after getting one piece of the map, and you only see the final one if you're not already on Scabb Island when you get the last piece. Thus, from the perspective of seeing all the content, leaving Rapp Scallion's piece for last and arranging things such that you can get both Elaine's and Lindy's pieces in the same trip to Booty Island, as I did here, is a mistake. I plan to correct this in a future revision. (In the meantime, it's easy to get at one of the missing scenes simply by leaving Booty Island after getting Elaine's map piece up in the Big Tree, then immediately returning.)
Part I: The Largo Embargo
Try to leave the screen in either direction. Talk to Largo LaGrande. Enjoy (?) being shaken down for all you're worth. Instead of going west into Woodtick proper, first turn east back the way you came and go to the beach. Pick up the stick. Go east again and talk to Bart and Fink, the pirates you were talking to in the introduction. Now return to Woodtick. Look at the sign with the shovel on it. Pick up the shovel. Cross the bridge. Skip the first door for now and go to the second. Talk to the cartographer. Work through all the dialogue. When talking about maps, notice that Wally says his eyes have seen the whole world (this is a hint for a later puzzle). Take a sheet of paper from the pile of paper near the bottom of the screen. When you're done, leave.
Go to the lit area at the top back of Woodtick, where there are what looks like flags on lines. Talk to the Men of Low Moral Fiber (pirates). Work through the dialogue, asking Frank what happened to his leg and if it's their rat. A passion for cheese, huh? Agree to get the wood polish. (Complaining about long, pointless stories is pretty rich coming from you...) Leave and go east. Go into the small standalone hut you passed by when you came in. Talk to Woody, the woodsmith. Hmm, another suggestion about a voodoo doll of Largo. Buy wood polish. Go back to the Men of Low Moral Fiber (pirates). Use the polish on the peg leg. Take the bucket. Say "Oh, sorry, is this your bucket?" Leave to the south and walk out of Woodtick to the east.
Go to the swamp on the east side of the island. Use the bucket on the swamp. Use the the coffin-boat. Go east. Keep going until you see the skull-shaped shack and row to it. Examine the table with a skull on it. There is a string dangling from here (quite hard to see). Pick up the string. Go east. Hi, Voodoo Lady! Work through the dialogue. Use the coffin and leave the swamp.
Go to the cemetery on the southeast point of the island. Walk up the hill in the background. Look at the graves. You will get a closeup view of the hilltop. Read the leftmost tombstone. Aha, an ancestor of Largo LaGrande: something of the Dead. Use the shovel on the grave. Enjoy (?) the view of your underpants. Leave the cemetery.
Go back to Woodtick. Look at the sign with a cocktail glass. Look at the other sign nearby, nailed to the mast. Go down the hatch into the Bloody Lip. Talk to the barkeeper. Largo will turn up for a drink. Notice that his "usual" gives him thick green spit that really goes the distance. Use the paper on the spit: something of the Body. Go back up on the deck. Click on the window on the side of the ship that the Bloody Lip is in. You will oh so gracefully swing yourself inside. Pick up the knife from the table and leave via the window.
Go west into the Swamp Rot Inn. Use the knife on the rope tying the little alligator to the mast. Look at the bowl and pick up the Cheese Squigglies. Go into the room at the back. Use the bucket of mud on the door. Hide behind the dressing screen. Enjoy (?) the juvenile little prank you've just played. Once Largo leaves, leave the inn and go to the laundry. Watch the scene. (And Largo sure is making a scene, isn't he?) Go back to Largo's room. Take the toupee from the dresser: something of the Head. Close the door and take the claim ticket from behind it. Open the door, leave, and go back to the laundry. Give the claim ticket to Marty. In exchange you'll get a bra: something of the Thread.
Leave Woodtick and go see the Voodoo Lady. Ask her about the voodoo doll. Go through the dialogue to give her all the ingredients. Use the coffin, leave the swamp, and go back to Woodtick. Go to the inn and into Largo's room. Use the pins on the doll. ...Oh dear. Looks like your urge to boast has doomed the Caribbean to another reign of terror from LeChuck... oops? Work through the scene with the Voodoo Lady: nowhere to hide, nothing that can protect you, blah, blah, blah. Leave the shack. Read the book about Big Whoop.
Go to the laundry. Open the box. Use the string with the box, then use the string with the stick. (Yes, you have to do it in that order.) Use the Cheese Squigglies with the box. Walk a little ways away and ready the action of using the string. When the rat goes for the bait, use the string. Open the box and pick up the rat. Go into the Bloody Lip kitchen through the window. Put the rat in the soup pot. Go back out the window and then enter the regular way, through the hatch. Talk to the barkeeper. Ask him how the stew is. When he offers you the cook's job, take it. (Hmmm... didn't he recently give all the money he had to Largo? Where's he getting 420 more pieces of eight to pay a week's wages in advance?) In the kitchen, slip out of the window again. (Aren't you naughty?)
Leave Woodtick and go to the peninsula on the southwest of the island. Enter the houseboat. Talk to Captain Dread. "His eye that has seen the world," eh? Go to Wally's. Wait until he puts down his monocle and rubs his eyes. Take the monocle. Return to Dread's boat and give him the monocle. Tell him you need to charter a ship.
For Your Amusement:
At the beginning of the game, before moving, repeatedly look at your money.
When talking to Woody, go down the "how much wood could a woodchuck chuck" dialogue line. (I think it's funniest to say "Oh. Shut up." rather than actually completing it.)
Part II: Four Map Pieces
Settle in, bucko; this part is long, with a lot of bouncing around between the islands. (Ron Gilbert says in the Special Edition commentary, "Player be damned"! Gee, thanks, Ron.)
Relax and watch the cutscene. (Sooo... why is Largo correcting LeChuck about your name?) On Dread's boat, pick up the empty bag of parrot chow. Go inside the cabin. Ask Dread about your choices of destination. When Dread shows you the map, go to Phatt Island.
Phatt Island (1)
Upon arrival, you'll immediately be captured by a guard. Talk through the scene with Governor Phatt. You'll be put in the slammer. (Weird that they confiscate everything except your money, isn't it?) Pick up the mattress, then pick up the stick underneath it. Use the stick with the leg bone of the prisoner. (Okay, "Bone Master", whatever you say.) Pick up the bone. Use the bone on the dog. Pick up the key. Use the key on the cell door. Pick up both the gorilla and the manila envelopes from the desk/shelf/thing. Open both envelopes. Leave the jail.
Walk into the first nearby alley. Watch Ralphie play the betting wheel. Leave this alley and walk into the second alley. You will automatically hang back in the shadows and eavesdrop on Ralphie talking to Bruno. Afterwards, walk up to the door and use the slot. Ask what the next winning number is going to be. The secret to the "password" is that you should answer the actual number of fingers Bruno is holding up when he says "If this is X." Make a note of the winning number he tells you. Go back to the first alley. Wait while Ralphie wins again. Talk to the dealer. Tell him you'd like to place a bet. Choose the number Bruno just told you. When you win, ask for the invitation to Elaine's Mardi Gras party. Leave the alley.
Go to the library. Look at the model lighthouse. Open it and take the lens. (If it helps, this optional bit of thievery is to replace Wally's monocle.) Use the card catalog. This is arranged only by subject, and the subjects may not be what you think they are. (Oh, for the Library of Congress...) Open the CD drawer and click the furthest-back card in the first column (Disaster). Remember the title "Great Shipwrecks of our Century". Exit the drawer. Open the PQR drawer and click the third card in the second column (Recipes, Voodoo). Remember the title "The Joy of Hex." Click the second card in the third column (Quotations) and remember the title "Famous Pirate Quotations." Pick whatever fourth book you like, from any drawer, and remember its title. Say you've had it with this card catalog. Go over to the librarian. Give her the book about Big Whoop. Talk to her. Say you're looking for a book. Go through the dialogue for getting a library card. Ask her for the books that you remembered. (Ahem! A librarian would never tell you who checked out a book! Libraries are very proud of protecting their patrons' privacy!) Read the shipwreck book, and make a note of the latitude and longitude of the wreck of the Mad Monkey. Leave the library.
Go out to the end of the little pier. Talk to the fisherman. Take his bet. Leave the pier. Go up the path leading out of town, which takes you to the island map. Go to the Governor's mansion. Open the gate. Open the front door and go inside. Talk to the guard. Tell him there's a fire in the kitchen or that there's a three-headed monkey. Go upstairs. Try to take the book (Famous Pirate Quotations) from the bed. Use your extra book on Famous Pirate Quotations. You will rip out a few pages to make the weight match (...oh, my heart!) and swap the books, Indiana Jones style. Leave the mansion and go to Dread's ship. Head to Booty Island.
For Your Amusement:
Open the LM drawer, and read the fourth card in the second column, "The Majesty of the Sierras".
Read all the catalog cards. Or you could be a chicken and consult this full list. (All the titles are funny to varying degrees, but only some have extra comments.)
Tell the librarian your name is Herman Toothrot. (The consequence of this is that you can only check out three books instead of four; perhaps you'll remember that in Secret Herman told you that he had a fine on an overdue library book that must be very large by now.)
Choose "Consultant" as your occupation, then pay attention to what the barkeeper of the Bloody Lip says when you give him the library card as ID.
Booty Island (1)
Talk to the man standing next to the cannon, Augustus deWaat. You won't get anywhere, but keep in mind the fact that he'll fire the cannon if he thinks the mail ship is coming in.
Go into the building on the left, the Booty Boutique. Pick up the old saw (ha ha) that's in the barrel by the door and buy it. Also pick up and buy the ship's horn and the sign. Use the parrot chow bag with the hook that the sign was hanging on. Pick up and buy the mirror. Look at the map piece on the glass display case. Talk to the antique dealer. Ask how much the map piece is, then go on to credit and trade-ins. Note that he'll take anything valuable made of bronze; then he'll tell you he wants the figurehead of the Mad Monkey. Well, well; you know just where to find that! Leave the shop.
Go into the costume shop. Give the invitation to the shopkeeper. Pick up the dress. Leave the shop. Talk to the woman outside, Kate Capsize. Tell her you're interested in chartering a ship. Oops, right now you don't have that much cash. Ask her for one of her leaflets. Walk to the path to the west of Augustus to go to the island map. Go to the "Small Structure" on the thin strip of land that connects the main island to the islet where the governor's mansion is. AAAUGH! It's LeChuck! ...oh, wait. Phew! Since you do have the invitation and costume, choose those dialogue options. Follow the path up the hill, over the log leading east, and to the mansion. Open the door and go in. You can hang around and listen to all the party guests, if you like. Take the map piece from the frame over the fireplace. Gosh, that was easy! Leave the mansion. Oh, maybe not so easy: you'll be caught by the sharp nose of Guybrush the Dog. Enjoy (?) the view of your other pair of underpants, which you apparently had the opportunity to change since digging up Largo's grandfather's grave. You'll be hustled upstairs by Filbert, the gardener.
Enjoy (?) the music and grovel for Elaine until she seems to be softening. (There's a hidden points count going on here, so if you feel like amusing yourself by picking the rude options, you might want to save a game first. You can't actually fail, but it's possible to dig yourself into a deep enough hole that it becomes quite tedious to dig back out of.) But then, of course, once things are looking up, you will say exactly the wrong thing, and Elaine will toss the map out the window.
Go out the front door. Try to pick up the map piece. Keep trying, six times, until it flies off the ground. Take note of where it lands, on a cliff on the south side of the island. Go back into the mansion and go upstairs. Take the oar from the wall. Leave the mansion. Walk around to the back side. Push the garbage can or use the ship's horn. When the cook comes out to investigate the noise, run to the left and lead him in a circle around the mansion. You want to beat him arriving at the back side again. Go into the kitchen and pick up a fish. Walk around to the front again. Pick up the dog. (Live animals stuffed into your coat: 1.) Walk to the mansion grounds and go back out to the island map.
Go to the Big Tree. Put the oar into the second of the holes spiralling up the tree. Walk to the plank, then to the oar. You will fall, get a nasty crack on the head, and have an interesting... dream? vision? something. You don't need to write down the lyrics of the Bone Song; it'll happen automatically on the paper left over from Largo's spit. When it's over, pick up the broken oar. Go to Dread's ship and return to Scabb Island.
For Your Amusement:
In the Booty Boutique, talk to the parrot after looking at each of the items in the shop.
In Elaine's room, look at the mirror (this has different responses in the original and Special Edition), the bust, and the chest.
Scabb Island (1)
Go to the woodsmith's. Give him the broken oar, and apparently being a very generous fellow with a strong work ethic (unlike some pirates we could name), he'll repair it for you for free. Leave and go to Wally's. Give him the lighthouse lens to replace the monocle you stole from him. Leave and go down into the Bloody Lip. You'll get fired for walking off the job (okay, fair enough), but the barkeeper seems pretty sanguine about it otherwise. Talk to the barkeeper and order a grog. Show him the temporary library card. Order a Yellow Beard's Baby and a Blue Whale. Exit the conversation. Mix the yellow and blue drinks. Look at the monkey playing the piano (Jojo). Look at the metronome. Use the banana with the metronome. Pick up Jojo. (Live animals stuffed into your coat: 2.) Leave the bar. Go to the laundry. Saw off Frank's peg leg. (Wow, you really are a dick in this one, aren't you?) Leave the screen. That surely woke Frank up! Go back to the woodsmith's. He apparently also makes onsite repairs, so while he's gone, get some nails and the hammer. Leave Woodtick, go to Dread's ship, and go to Phatt Island.
For Your Amusement:
In the woodshop, pick up the stool.
Phatt Island (2)
Walk to the fisherman's pier. Give him the fish and you will get the pole. Go to Dread's ship again and go to Booty Island.
Booty Island (2)
Go to the island map and go to the cliff on the south side of the island. Look at the cliffside. Notice the map piece still stuck down there. Use the fishing pole. Aww, clam dip! (Seagull courtesy of LOOM again, no doubt.) Notice that the bird flies off to the Big Tree area. Go to the Big Tree. Use the reinforced oar in the hole. Walk to the plank, then the oar. Pick up the plank and put it in the next hole. Walk to it. Repeat with the oar. At this point you'll get the idea and you'll be spared having to actually act out climbing the whole tree this way. (Unlike a certain Sierra game I could name *cough* KQ6...) Go into the hut. Use the dog -- who is so good at sniffing out the Governor's property, remember? -- on the pile of maps. Leave the hut and go to the smaller lookout hut at the top left. Take the telescope. Go back down to the ground.
Go to Ville de la Booty. Enter Stan's Previously Owned Coffins. Tell Stan you're looking for a good used coffin. When he gets in a coffin to demonstrate how roomy it is, close the coffin. Just before you can do it, he'll give you a handkerchief. Once the lid is closed, quickly use the nails on the coffin lid. Pick up the crypt key from the peg board behind the cash register. Leave. Go east to the spitting contest grounds.
Use the crazy straw with the green concoction. Talk to the Spitmaster. This first time, you won't win, so do whatever you like. It's not possible to get first place without cheating, sooo... let's cheat! Use the ship's horn. Augustus, thinking the mail ship has arrived, will set off the cannon, distracting the Spitmaster. While he's not present, quickly use the first place flag, and you will shift them all down one place closer to the foul line. Before you spit again, take a look at the lady standing on the right end of the line of spectators. Her sash flutters in the breeze. You want to spit when the wind is strongest behind you. When you've won, leave to the west.
Go to the Booty Boutique. Give the spit plaque to the antique dealer. Hey, it's not just any lump of pus, it's the spit of the person who killed LeChuck! Once you've sold your highly valuable item, leave the shop and go talk to Kate. Charter her ship and give her the 6000 pieces of eight that you now have. Tell her you're ready to leave. Check the latitude/longitude from "Great Shipwrecks of our Century" and click the correct spot on the map. When you get there, dive in. Pick up the monkey figurehead. Walk over to the anchor on the left and use it. Once back on Booty Island, go to the antique shop. Give the monkey head to the dealer. Leave the shop, go to Dread's ship, and go to Phatt Island. Watch the cutscene.
For Your Amusement:
Wait around underwater for 10 minutes.
After nailing Stan into the coffin, use the hammer to try to take the nails out.
In Stan's shop, use the hammer on the cash register.
Phatt Island (3)
When you arrive on Phatt, use Kate's leaflet with the wanted poster. Walk off to the north and up the path as if going to the island interior. Watch the cutscene where Kate comes ashore and gets captured as "Guybrush". (You jerk.) Go back to the wharf and into the jail. Take the vanilla envelope from the desk/shelf. Open it to find a bottle of near-grog (which the Bloody Lip barkeeper said he had sold the last of to Kate). Use the key on the cell door to let Kate out. (Or don't, if you have no remorse about framing her and stealing her personal effects. You jerk.) Leave the jail and go out to the island map. Go to the waterfall on the west side of the island.
Walk up to the top of the hill over the waterfall. Look at the pump. Try to push or pull it. You'd need a monkey wrench, huh? Use Jojo with the pump. Ta-da! Literal monkey wrench. (Those who are not familiar with this American English term apparently need not apply.) Notice that the sound effect of the waterfall goes away. Walk back down the hill. Enter the newly discovered gaping hole. Follow the tunnel to the left until you come out on the islet to the west of Phatt Island. Walk up to the cottage, open the door, and walk in. Talk to Rum Rogers Jr. Reason and pleading are no good here, so challenge him with that old chestnut: "I'm Guybrush Threepwood. Prepare to die." When Rum sets a mug o' grog in front of you, quickly pick it up, pour it into the poor unsuspecting tree in a barrel at the top left, then pour the near-grog into the mug. You will automatically sit back down, drink the near-grog, and win.
Use the mirror in the frame on the wall. Open the shutters. Go outside. Use the telescope on the statue. A beam of light will pass through, bounce off the mirror, and highlight a particular brick in the wall. (Insert Pink Floyd joke here.) Go back inside and push that brick. Pick up the map piece the skeleton is holding. Leave to the left and walk back up the path. Go to Dread's ship and return to Scabb Island. Watch the cutscene.
For Your Amusement:
Drink the real contest grog.
In Rum's cabin, look in the mirror. (This has different responses in the original and Special Edition.)
Repeatedly read the Phatt Island wanted poster as you progress.
Scabb Island (2)
Go east to the island map and go to the cemetery. Use the crypt key on the crypt (the one with the steeple looking thing on it, as distinct from the various things called "tomb"). Read "Famous Pirate Quotations" and note which quote is attributed to Rapp Scallion. Look at the coffins until you find the one that has that quote. Open it. Pick up the ashes. Leave and go to the swamp.
Use the coffin and go to the Voodoo Lady's shack. Pixel-hunt the jars on the shelf until you find Ash-2-Life. Pick it up. The Voodoo Lady will call you back. Tell her you'll take the Ash-2-Life. You're carrying the ashes and the "Joy of Hex" cookbook, so she'll mix it up for you. Use the coffin, leave the swamp, and go back to the crypt.
Look at the open coffin. Use the Ash-2-Life. Talk to Rapp. Agree to check the gas for him. Leave the crypt, leave the cemetery, and go to the beach. Go east, then walk out to the weenie hut. Use the key on the door and go in. Look at the stove. Use the knob to turn off the burners. Return to the crypt. Look at the coffin and use the Ash-2-Life again. Tell Rapp he was right, the gas was on. You'll receive the map piece you were after.
Leave the cemetery and go back to Woodtick. Go to Wally's. Give him one of the map pieces, and you will automatically give him all four. Sigh, one last fetch quest. Okay. Go to the swamp and to the Voodoo Lady's shack. Tell her Wally sent you, then leave. Open the juju bag she gave you and get the bomb and matches. Notice that a crate has appeared on the shore. Go to Woodtick, to Wally's. Oh no! He's been kidnapped! (Yes, yes, of course the map is what matters; very compassionate of you.) Go back to the swamp. Look at the crate. Open it, then use it to crawl inside. Watch the cutscene.
Part III: LeChuck's Fortress
Go east, through the doorway, and up the stairs ("walk to passage"). Walk to the tunnel off the east edge of the screen, then continue east. Look at the jail cell. Hey there, Wally! How's it hangin'? (Ha ha.) Talk to Wally. When you're done, go back into the passage and west back to the big archway. Walk up to the sign and then left or right to enter the back tunnel.
Look at the spit-encrusted paper and make a note of the first bone mentioned in each of the lines (rib, arm, head, or leg); you can disregard the second bone in each line. Keep walking through the tunnel until you find an "ugly bone thing" that matches the sequence of the first three, top to bottom. When you find it, push it and walk through. Repeat for the other three verses. You may wind up going back through a door you just came through, or there may be only one choice. If you did it right, you will come to a huge door with massive locks. Push the door and you'll find the "doggie door" that's set into it. Pick up the key. ...Uh oh.
Relax (?) while LeChuck describes his Rube Goldberg torture setup. After he leaves, use the crazy straw with the green drink. Spit at the shield to your left (the right side of the screen) four times. The fourth glob will put out the candle and you and Wally will... somehow... get out of your chains. In the dark, light a match. ...Ooooh dear.
For Your Amusement:
In the torture room, hang around doing nothing for a couple of real-time minutes, so that the candle actually burns through the rope and you and Wally fall.
Part IV: Dinky Island
Get the bottle from the ocean. Break it by using it on the sign or the rock. Talk to Herman Toothrot. Go west and into the jungle. Go west and follow the path northwest. Look at the bag hanging from the tree. Use the broken bottle on the bag. Pick up the box and look at it. Return east, southeast, and south to the beach. Pick up the crowbar that's on the ground between the still and the crates. Open the barrel and get the cracker. Get the martini glass that's sitting under the still. Fill it with seawater. Use the glass of water with the still. Use the distilled water with the cracker mix. Give the parrot a cracker: "Head due east from the pond to the dinosaur."
Go back into the jungle. This time, take the east path. This is the pond the parrot was referring to. Look at the box sitting by the pond. Pick up the rope that is wrapped around it. Use the crowbar on it to open it. Get the dynamite. Take the path going directly east and continue east across the next screen. The parrot will fly in to sit on the dinosaur-shaped topiary. Give it another cracker: "Head north from the dinosaur to the pile of rocks." Go north twice to a pile of rocks. Again, the parrot will fly in; give it a cracker: "Head due east from the rocks to the X." Go east. Herman will show up and show you a shortcut back to his camp. Return east to the X (walk to shortcut). Use the shovel on the X. When you hit cement, light the dynamite and use it on the cement. Use the rope with the crowbar. Use this improvised grappling hook with the twisted metal rods at the edge of the hole.
For Your Amusement:
Ask Herman what he's doing, how many students he's got, and to teach you some philosophy. Then go through all the colors, and I do mean ALL of them. (This will take several minutes.)
Wander around at random in the Dinky Island jungle until you find a tree with a phone attached to it, and call LucasArts: 1-800-STAR-WARS (1-800-782-7927).
The Tunnels
In the dark again, pixel-hunt in the right-center of the screen until you find a light switch. Use the switch. Enjoy (?) LeChuck's demonstraton of his voodoo doll.
This part of the game can get rather annoying since LeChuck will come along at random and zap you to another room. Sometimes his appearances are very close together; sometimes you have quite a while to wander around. (If you're interested, Ron Gilbert posted a snippet of the script controlling this timing on his blog.) When he does appear, you have just enough time for one quick action, but only if you had it already prepared. Because of this random factor, rather than giving specific room-connection directions, here's a map of the tunnels:
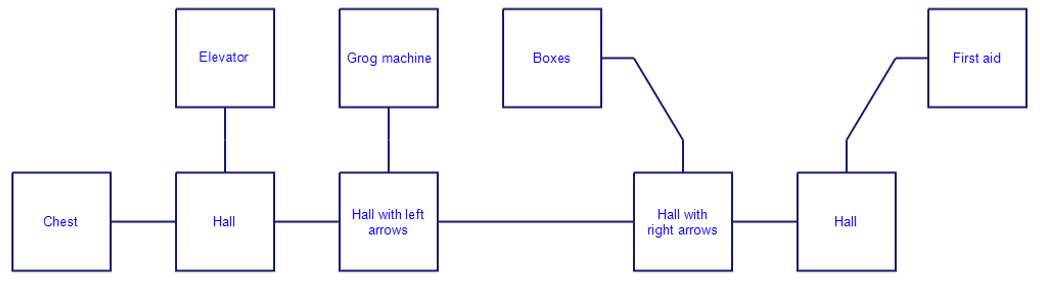
Go all the way west to where you crashed ("Chest"). Pick up the E ticket. (This is not necessary, just a hint about the theme park thing.) Ready the action "give clean white hankie". Wait for LeChuck to show up, then give it to him. He'll blow his nose and hand it back to you: something of the Body. (Ew.)
Go to the storage room with boxes. Open the three boxes towards the left and bottom of the open area. Get the balloon and a doll. Go to the first aid room. Look at the skeletons. Pick up the remains of the skeleton on the right: something of the Dead. (If LeChuck is really your brother, then these are his ancestors too.) Open the drawer in the desk near the bed and pick up the syringe; this will make a nice pin. Open the trash can near the bed and pick up the "stuff", a pair of rubber gloves.
Go to the storage room with the Grog machine. Use the gloves and balloon on the helium tank in the back corner. Use the coin return. A coin will fall out. LeChuck will show up and bend over to pick it up. While his back is turned, pick up his underpants to give him an epic wedgie: something of the Thread.
Go to the hallway with the elevator. Read the plaque to the right of the doors to learn that the elevator has a 1000-pound limit. Push the call button and go in. Look at the crate: 900 pounds. Hmm, you may be a slim lad, but surely you weigh more than 100 pounds? Fortunately, thanks to video game logic, the three helium "balloons" you're carrying will lighten you enough that the elevator can operate. Ready the pull action and hover the mouse cursor over the lever. When LeChuck appears, quickly pull the lever. The doors will close, trapping his beard. Pick up the crispy beard bits: something of the Head.
Open the door and walk out to... wait, the alley on Mêlée Island? What's going on here? At least it's a place that's safe from LeChuck. Use the doll, hankie, underpants, beard, and skull with the juju bag. LeChuck voodoo doll in hand, go back down the elevator. Ready the action "use hypodermic syringe with voodoo doll" and wait for LeChuck to appear. When he does, quickly perform the action. Change rooms and you will automatically get the doll ready a second time. You can stab LeChuck or stretch him if you like, but what you have to do to progress is tear the leg off the doll. (Shades of Largo saying "I'm going to tear you limb from limb"?) Agree to go over and take LeChuck's mask off. Enjoy (?) one of the most controversial endings in adventure game history.
For Your Amusement:
Get the root beer in the storage room and use it on LeChuck.
Use the filled gloves or balloon to inhale the helium several times. (There's several songs you can sing; they're different in the original and the Special Edition.)
For Your Amusement at any time:
Press Ctrl + Alt + W. (save first)
Last updated: 9/03/2024