
Note about "For Your Amusement": I don't know if you noticed, but this game is a comedy. There are many jokes and references in the dialogue options, object descriptions, and scene decor. Documenting them all doesn't really serve the purpose of a walkthrough, so I've tried to exercise restraint and only suggest actions that are more unusual or might be overlooked, or notable Easter eggs. If you want something more thorough, see World of Monkey Island's page about in-jokes.
In the interests of a more complete experience, some actions are taken that aren't strictly necessary to complete the game, and the path taken isn't always the most efficient one. You don't ever need to talk to the Men of Low Moral Fiber (pirates), for instance, nor even the Voodoo Lady, and you don't actually have to show proof that you've completed the trials to the Important-Looking Pirates, but it's fun to do so.
Part One: The Three Trials
Walk down from the path to the docks. Look at the poster of Governor Marley. Go east across the docks to the Scumm Bar and open the door. Walk in. Talk to the pirate in the red coat and black hat closest to the door. Talk to the pirate sitting underneath the spinning anchor. Talk to the man sitting at the round table at the right center of the screen. Talk to the dog next to the curtain at the right side of the screen. Go east to the next room. Talk to the important-looking pirates. ("What's in that grog stuff, anyway?" *pushes glasses up nose* Actually, battery acid is sulphuric/sulfuric acid. But then, this franchise is where pedantry goes to die.)
Hang about and wait for the cook to leave the kitchen. (This may take a while.) When he does, continue to wait until he walks off screen to the left. Go into the kitchen. Get the meat and the pot that is under the table. Open the back door and go out onto the pier. Look at the fish. Walk onto the right end of the bottom-most board of the pier, so that it tilts up like a see-saw and launches the seagull into the air. Repeat a few times until the seagull flies away from its meal. Pick up the herring. Leave the bar. Watch the cutscene.
Go back west past the dock, up to the lookout point, and walk through the archway to get to the island map. Go to the bright spot labeled "clearing". Walk down to the left and into the circus tent. Relax for a bit while you overhear the Fettucini Brothers' conversation. Once given the chance, talk to them. Ask how much you'll be paid and agree to 478 pieces of eight. Tell them of course you have a helmet. Give them the pot. When it's over, you will leave the tent, presumably with a raging headache. Exit the screen to the right.
Go back to the village. Continue east until you walk through an archway to the Low Street. Talk to the man with the parrot on his shoulder, the Citizen of Mêlée. Tell him you once had a barber called Dominique. Buy the map from him. Walk left. Talk to the Men of Low Moral Fiber (pirates) on the left of the scoreen. Open the door in the center of the buildings on the right-hand side of the street. Go into the voodoo shop. Look at everything in here. Get the chicken from on top of the crate at the lower right. Go east. Talk to the fortune-teller. Ask her about the chicken and about your future.
Leave the shop and go north under the clock tower to the High Street. Skip the first building here for the moment and walk into the alley beside the church. Talk to (or is that "get threatened by"?) Fester Shinetop. Walk back out to the street. Pass by the church (or go in if you like, but there's nothing to do there right now) and go into the last doorway. Talk to the prisoner in the cell on the left; you'll find that you can't stand to do so because of his bad breath. Leave the jail.
Now go back and enter the first building, the general store. Pick up the sword from on top of the chest near the counter, and the shovel that's up on the gallery level next to some rolls of fabric. If the storekeeper isn't here, ring the bell on the table. Talk to the storekeeper. Say "About this sword... I want it" to buy the sword, and repeat with the shovel. Then tell him you could really use a breath mint. To leave, tell the shopkeeper you'd just like to browse. Return to the jail and give the prisoner the mints. Talk to him, but you can't help him right now. When you're finished, leave. Go all the way back up to the lookout point and walk through the archway to get to the island map.
For Your Amusement:
Press Esc in the middle of Cobb's sales pitch, as if skipping a cutscene or animation, to get some extra dialogue.
Look at Elaine's poster again after hearing about LeChuck. (This poster actually tracks the game state pretty finely: before you've talked to anyone, after you've heard about a pirate terrorizing the island but not what his name is, after you know it's LeChuck... and there's future changes as well.)
Next to the Men of Low Moral Fiber, repeatedly hover the mouse cursor over the rat until you scare it away.
Repeatedly look at the clock tower.
The Trials
You can do the trials in any order, although if you leave the thievery trial for last you will miss seeing a scene with Elaine. The order I've chosen here is how long they each take to complete.
Treasure-Huntery
Go to the fork. Look at the map you bought. They're not actually dance steps; they're screen directions. "Back" means towards the back of the pseudo-3D scene, that is, north, or "upstage" if you like. Starting from where you are, follow the directions as written: back, left, right, left, right, back, right, left, back. You should reach a screen where there is a line of red flowers across the lower part of the screen. Go east. Look at the plaque (sign) and the marker. Use the shovel on the X on the ground. (Gosh, aren't you considerate, putting all that dirt back?) Look at your new prize, the T-shirt. Exit to the west and north to return to the island map. If you like, you can return to the Scumm Bar and show off your new T-shirt.
Pirates that you can swordfight will now be wandering around the map, but you can't actually fight them yet because you haven't been trained. If you bump into one, just say "Sorry to bother you" to exit.
For Your Amusement:
(EGA version only) Look at the stump in the forest.
Thievery
Go to the fork, then one screen north. You may have heard Otis talk about these yellow Caniche endormi flowers. Pick the flowers. Use the flowers/petal on the meat. (Alternate solution: put the meat and the flowers in the cooking pot in the Scumm Bar kitchen.) Leave the forest by going east twice. Go to the village and walk up to the High Street. Go west through the archway past the jail and follow the path to the Governor's mansion. Give the drugged meat to the piranha poodles. Open the mansion door and go in. Take the vase, if you like. (This doesn't materially affect the game, but the scene is slightly different depending on whether you take it or not.) Go into the first doors on your left. Relax and watch the sentence line while you do braver and sillier things than you probably thought possible.
When it's over and you say you could get the idol if you had a file, leave the mansion. Walk back into town and go into the jail. Talk to Otis. When he says you can have the carrot cake if you have something to get rid of rats, give him the gopher repellent. Use the cake to find the file.
Return to the mansion. Go back into the "gaping hole" you left when you, ah, exited from behind the portrait. Watch some more textual absurdity that stretches the definition of "cutscene". Stumble over your own tongue when you try to talk to Elaine. Then, leave the mansion. Oh crap, it's Fester again. You will get tossed in the ocean. Pick up the idol. You will automatically walk up the ladder onto the dock and pick up a sword on the way. Once back on the dock, relax for a cheesy romantic cutscene with Elaine. If you like, go to the Scumm Bar and show the idol to the important-looking pirates.
For Your Amusement:
Look at the poster of Elaine after stealing the idol.
Wait underwater for 10 real-time minutes. (Save first -- yes, really. There's an achievement for this in the console version of the Special Edition.)
Swordfighting
Go to the lookout point and through the archway to the map. A little distance to the west of the big collection of lights on the inner bay, there is a grey dot labeled "bridge". Go there. Talk to the troll. Give him the fish: it's a red herring. ("Something that attracts attention but has no real importance", get it?)
Go to the house at the end of the path. (You can check out the "lights" on the way if you like, but you'll find that Stan isn't in at the moment.) Look at the sign. Open the door of the house. Talk to Captain Smirk. (Depending on your dialogue choices, you may need to knock again.) When you get to the option about training to be better than the Sword Master, tell him you do so have what it takes. Keep whining "I do so!" until he relents. Pay Smirk and show him your sword. There's no way to do well with the insults now, so choose whatever options you like.
When you're back outside Captain Smirk's place with your starter kit of insults, leave the screen to the south to go back to the map. Now you need to encounter many (sigh... many) of the roving dots on the paths to fight pirates and learn insults. Don't actually click on the pirates to encounter them. Instead, click near them, then stand still and they'll run into you. Parking yourself near the fork is pretty effective. Start fights with "My name is Guybrush Threepwood. Prepare to die!" Keep trying everything you don't already know the proper response to, and pray that the Random Number God is in your favor.
This will probably take a good 20-30 minutes if you want to be diligent about collecting them all. You don't have to get all 16 pairs to beat the Sword Master, but it's helpful (and console versions of the Special Edition have an achievement for doing so). Getting the last pair or two can sometimes be an exercise in frustration, because of the randomized nature of the sequence. In any case, you do need to win at least three fights, after which your opponent will tell you you're good enough to beat the Sword Master.
Have you stopped wearing diapers yet?... Why, did you want to borrow one
I got this scar on my face... I hope now you've learned to stop picking your nose
I once owned a dog... He must have taught you everything you know
I'm not going to take your insolence... Your hemorrhoids are flaring up
I've heard you were a contemptible sneak... Too bad no one's ever heard of YOU at all
I've spoken with apes more polite than you... I'm glad to hear you attended your family reunion
My handkerchief will wipe up your blood... So you got that job as a janitor
Nobody's ever drawn blood from me... You run THAT fast?
People fall at my feet... Even BEFORE they smell your breath?
Soon you'll be wearing my sword like a shish kebab... First you'd better stop waving it like a feather-duster
There are no words... Yes there are, you just never learned them
This is the END for you... And I've got a little TIP for you. Get the POINT?
You fight like a dairy farmer... How appropriate, you fight like a cow
You have the manners of a beggar... I wanted to make sure you'd feel comfortable
You make me want to puke... You make me think somebody already did
You're no match for my brains... I'd be in real trouble if you ever used them
When you're ready to take on the Sword Master, go back to the village, through the docks and Low Street, and into the general store. Talk to the storekeeper and tell him you are looking for the Sword Master. When he leaves, follow him through the village and up past the lookout to the map. He'll go to the fork. Keep following him through the woods. He'll move a sign to make a bridge appear; follow him across the bridge. When the cutscene is over, talk to the Sword Master, Carla. She uses 17 insults that are different than the wandering pirates', but the same responses still work, you just have to think a bit to recognize the connection to one of the responses you already know.
Every word you say is stupid... I wanted to make sure you'd feel comfortable
I hope you have a boat... Why, did you want to borrow one?
I usually see people like you passed out... I'm glad to hear you attended your family reunion OR Even before they smell your breath
I will milk every drop ... How appropriate, you fight like a cow
If your brother's like you... You make me think somebody already did
I've got a long, sharp lesson... And I've got a little TIP
I've got the courage and skill... I'd be in real trouble if you ever used them
My last fight ended with my hands covered in blood... I hope now you've learned OR Your hemorrhoids
My name is feared across every dirty corner... So you got that job as a janitor OR Too bad no one's ever heard of YOU (A bit of a weird flex, that second one. What's the "you" that people might or might not have heard of separate from her name, without getting into philosophy that's outside the scope of this game?)
My sword is famous... Too bad no one's ever heard of YOU
My tongue is sharper than any sword... First you'd better stop waving it
My wisest enemies run away... Even BEFORE they smell your breath
No one will ever catch me... You run THAT fast?
Now I know what filth and stupidity... I'm glad to hear you attended
Only once have I met such a coward... He must have taught you OR I'm glad to hear you attended
There are no clever moves... Yes there are, you just never learned them
You are a pain in the backside, sir... Your hemorrhoids
You have to give the correct response five times to beat Carla. When you've won, you'll be in possession of a fine 100% cotton T-shirt. Go west to leave the area and you will automatically walk back to the fork.
Governornapped!
Go back to the village. You will be just in time to see LeChuck's ghost ship sail away with Elaine on board. Talk to the lookout. Look at the note he gives you. Go east and into the Scumm Bar. Huh, where did everybody go? Talk to the sobbing cook. (Health Board? Mêlée Island has a Health Board?) When you're done, go to Low Street and into the voodoo shop. Talk to the fortune-teller. Now that you know your purpose, she'll have more to say about your future.
Well now, if you're going to rescue Elaine, it's time to get a crew and a ship!
Otis
Return to the Scumm Bar. Pick up the three empty mugs from the tables. Go east. Get the two empty mugs on this screen. Open the door to the kitchen. Look at the barrel in the corner. As you might have suspected from the recipe, grog is nasty stuff. You need to transport this grog all the way to the jail, but it will melt these pewter mugs you're carrying tout de suite, so you can't just fill one and take it there; you have to pour it from mug to mug as they melt by saying use melting mug with mug. (If you're playing the Special Edition, this puzzle is easier to deal with in the classic graphics because of the nature of the SE's inventory interface.) You have just a few seconds before a mug o' grog becomes a melting mug. It will take about 50 more seconds to progress to the next failure state, mug near death. This is your last chance to pour the grog into another mug to get a fresh mug o' grog, because in another few seconds, you'll just have a pewter wad, which will disappear from your inventory in a few more seconds.

Keep an eye on your inventory as you walk. If you are very quick and accurate, it's possible to accomplish this with just two mugs, but three is easier and all five will give you plenty of breathing room. Don't panic, though; if you don't make it, more mugs will mysteriously appear in the Scumm Bar so you can try again.
All that said, use one of the mugs on the barrel of grog. Leave the bar and go east through the archway. Make your way through town, transferring the grog into new mugs as you go. Enter the jail. Use the current melting mug on the lock on Otis's cell. After Otis leaves, leave the jail. Watch the cutscene. Walk back through town, past the docks, to the lookout and onto the island map.
For Your Amusement:
Look at the poster of Elaine after she's been kidnapped.
Pour the grog on the lock of the other jail cell (the one with the rat).
Talk to the Men of Low Moral Fiber (pirates) and try to get them to join your crew.
Meathook
Go to the location marked "shore", at the top right center of the map. Use the pole and you will climb the ladder. Use the rubber chicken on the cable. Go to the house and open the door. Tell the man the Governor's been kidnapped, then that you want to get a crew together. When Meathook says to, open the small door. Use whichever verb you like on the revealed parrot murderous winged devil. When the scene is over, return across the cable via rubber chicken. Leave the screen to the west to return to the island map.
Carla
Go to the Sword Master's (you can now just click on its dot on the map). Talk to Carla. Tell her the Governor's been kidnapped. Leave and go back to the island map. (Wow, that was easy!)
Buying the Sea Monkey
Go to the "lights" (or Used Ship Emporium, if you went there earlier on the way to Smirk's). Stan is now open for business. Tell him you don't have that much to spend. Stan will show you the Sea Monkey. Tell Stan you were hoping to get it on credit. Exit the conversation by saying "On second thought" and then "I'd like to go think about it."
Go to the village, through the eastern archway, and around into the store. If the storekeeper isn't in, ring the bell on the desk. Tell the storekeeper you're interested in a note of credit and that you have a job. Watch carefully as he opens the safe. You may want to write down either the handle positions or the numbers of L/R (pull/push) movements that he does. When he asks what your occupation is, choose any job you like; none of them will succeed. You will get another chance to observe the combination as he puts the note back in the safe. Now, tell him you're looking for the Sword Master again. While he's gone, nip up to the safe and open it using Pull (Y) to move the handle counterclockwise and Push (S) to go clockwise. If you did it correctly, the safe will open by itself and you will automatically take the note of credit.
Go back through town, up to the lookout, and to the Used Ship Emporium. Ask to see the cheap ship again. Tell him you got credit from the storekeeper. If you don't want to listen to Stan gab about extras, the quickest way through this is: Make him an offer. Offer 2000, then 5000. Tell him "Forget it", then "Well, maybe you're right." Repeat those two choices. Offer 5000 again and he will now accept. (If you do go into "talk extras" and reject them all, Stan will eventually accept 3000 pieces of eight. You're supposed to be able to haggle him down to 2000, but there's a bug that causes the cost of the porthole defoggers to not be deducted from the price of the ship. This bug is fixed in the Ultimate Talkie, so in that version you can actually buy the ship for 2000 pieces of eight if you do it right.)
Leave the shipyard to the west. Return to the village. You will automatically be taken to the dock where Stan awaits you with your ship. Watch the cutscene. Talk to Otis and Carla.
For Your Amusement:
After buying the Sea Monkey, read the note on Stan's office door.
Part Two: The Journey
Watch the cutscene. In the captain's cabin, open the drawer in the lower left of the desk. Look at the drawer. Look at the book you take. Take the feather pen from the desk, then take the ink. Leave the cabin. Walk behind the mast and go down the hatch. Go through the door to the galley. Open the cupboard. Get a box of cereal. Open the cereal. Look at the prize you find. Return up the two ladders to the top deck and go into the captain's cabin. Use the small key on the cabinet on the right side of the screen. Pick up the chest. Open it, then look at it. You will get a paper and some cinnamon sticks. Look at the piece of paper. Leave the cabin.
Go to the rope ladder on the mast. You will climb to the crow's nest. Take the Jolly Roger. Go back to the deck and go back down the hatch. Go down the other hatch here. Open one of the kegs on the left of the screen and you will automatically take some gunpowder. Take the giant piece of rope from the barrel on the bottom center of the screen. Open the chest on the bottom right. Look at it and you will take some wine. Go up and back through the door to the galley. Put the following items in the big cooking pot on the fire: rubber chicken (= chicken), breath mints (= mint), ink (= squid ink), cereal (= pyridoxine hydrochloride etc.), gunpowder (= brimstone), wine (= blood), Jolly Roger (= pressed skull), and cinnamon sticks. (Hey, "every cook makes substitutions," as you hear if you choose to put the meat and flowers in the Scumm Bar kitchen cookpot instead of just rubbing the flowers on the meat.)
After the fireworks, you will be flat on your face and moaning, and will stay that way until you do something. When you're done giggling about this, click the cursor anywhere to stand up. Use any one of the following on the fire under the pot to make a flaming mass: the map, one of the T-shirts (!), Stan's business card, the feather pen, or the dusty book. (I can understand why the game doesn't allow you to burn any of Stan's seafaring pamphlets, because letting you burn two but not the third would be a giveaway, but you'd think you'd be able to burn the PTA notes, the recipe paper, LeChuck's kidnapping note, or the cereal box.) Take the small pot from the counter under the cabinet. Leave the galley and go back to the hold. Get some more gunpowder. Go up on deck. Holy monkey bladders! It's Monkey Island™! Use the rope on the cannon. Use the gunpowder on the cannon nozzle. Use the flaming mass on the rope. Use the pot, which will make you automatically get in the cannon.
Part 3: Under Monkey Island
Exploring Monkey Island
Watch the cutscene with Herman. Similarly to the aftermath of making the potion, you will just sit here and struggle as long as you find it to be funny. When you're ready, click the cursor anywhere and you will pull your head out of your -- er, out of the sand. Look at the piece of paper that's stuck to the tree. Pick up the banana that's lying on the beach. Walk into the jungle.
Go northwest. (If you seem to be walking really slowly, experiment with where you click; there are certain spots near the edge of the screen that will make you hustle.) Pass the mouse along the northern edge of the volcano caldera until you find the fort (it can be easy to miss if you're just looking with your eyes), and go there.
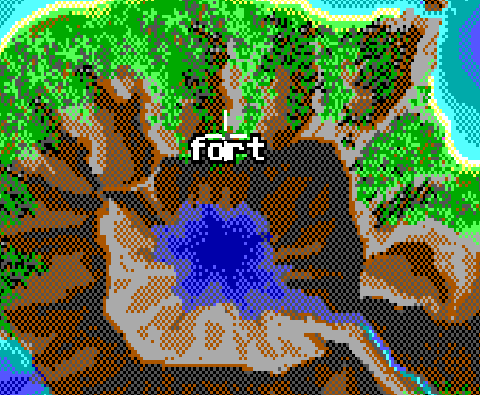
Pick up the spyglass and rope. Push the cannon. Herman will arrive and flap his jaws at you. After he leaves, pick up the gunpowder and cannon ball. (You actually only need one or the other of the spyglass and cannon ball, but it's not like there's an inventory limit.) Go east to leave the fort, then off the southeast edge of the screen, then north. Find the river fork and go there.
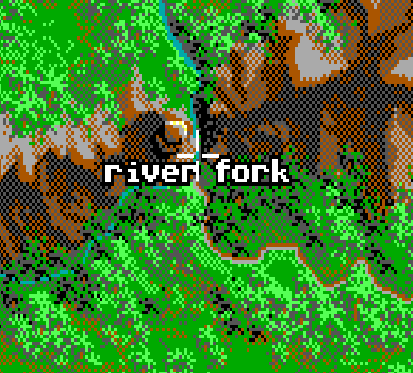
Get the note from under the small rock. Use the gunpowder with the dam. You now have five (!) choices for igniting the gunpowder:
1. Open the spyglass. Use the lens with the sun to concentrate its rays on the gunpowder. ("It sure is HOT here!")
2. Use the noteworthy rock, which is flint, with the staple remover. (Presumably the jaws are made of steel.)
3. Use the flint rock with the cannon ball. (It's not steel, but at least it's iron. *handwave*)
4. Use the flint rock with the unopened spyglass. (You'd think the spyglass barrel would be brass and not steel, but... okay.)
5. Use the flint rock with the compass. (This doesn't really make sense. The compass can't be encased in a ferric metal if it's to work, plus it looks yellow in the graphical inventories, suggesting perfectly sensible brass. Probably they were just letting you use any metal object, but brass isn't pyrophoric like steel is. But then, didn't I say this franchise was where pedantry goes to die?)
Go to the pond at the end of the river you just released. Look at the note. After Herman comes and goes again, get the rope from the corpse. Leave and go south. Go to the crack, near where you first landed. In among the greenery at the level you're standing on, there's a "strong branch".
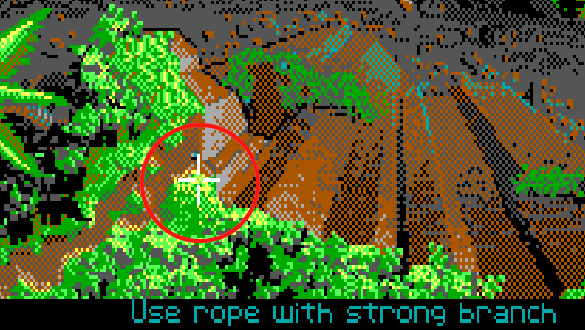
Use one of your ropes on the strong branch and climb down. Use the other rope on the sturdy stump that's here, then climb down again. Get the oars, which in EGA might look like just one of the rocks:
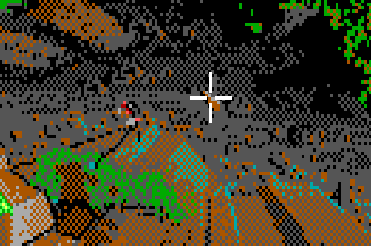
Return up by clicking on the spots you want to climb to. Go south to the jungle and then to the beach. Use the oars with the rowboat.
Go northeast, around the eastern peninsula, and to the north lobe of the island. (Again, if you seem to be moving very slowly, experiment with exactly where you click.) Land on the beach. Read the note. Go into the jungle and to the cannibals' village. Go two screens west. Get the bananas from the bowl. Return east and you'll be caught by the cannibals. Say whatever you like.
When you're locked in the "guest hut", read the memo. Get the skull that's lying alone on the floor. Notice that there is a loose board under it. Pick up the board and go down the hole. You will emerge in the background of the village and see a brief conversation between the cannibals.
Return to the beach, get in the boat, and go to the beach on the south side of the east peninsula. Pick up the bottle. Go into the jungle, west, and to the river fork. Go up the footholds in the cliff. Look at the note. Pull the "primitive art" twice so that the end of the log is facing straight towards the screen. Go up the next set of footholds. Look at the rock that's on the north edge of the cliff. Herman will show up again. When you're done talking to him, push the rock.
Walk all the way down, across the bridge, and to the south beach. Pick up the two bananas that were knocked off the tree. Return to the jungle. Go just a little bit north to the spot marked "monkey". (It moves, so you may have to chase it around a little bit.) Give the monkey all five bananas. Walk to the jungle, and the monkey will follow you. Go to the clearing on the eastern peninsula. Walk east to the fence surrounding the monkey head. Pull the nose on the totem pole on the left, then walk away from the pole. The monkey will jump up and swing on the nose, pulling it down. (Monkey see, monkey do!) Walk to the gigantic monkey head. Pick up the smallest idol ("wimpy little idol"). Leave and go back to the nearby beach. Herman will show up once again. Once he leaves, get in the boat and go back to the cannibal village.
Walk west towards the stone head, then back east. Say "Don't eat me! I'll give you anything!" Give them the idol you took from the monkey grounds. Go west and into the hut. Get the banana picker. Leave the hut and go east. Give the banana picker to Herman, who is mysteriously and conveniently here. Leave the village and immediately return. Tell the cannibals that actually, there is something they could do, and that you're looking for somebody. They'll tell you about their exorcism potion that they need a special root to make, and then that you won't be able to get through the catacombs without the Head of the Navigator. Look at the pamphlet, leaflet, and brochure you are carrying. Give them the leaflet (the blue/green one in graphical inventory), which is titled "How to get Ahead in Navigating", in exchange for the head. Note that it's wearing a necklace that confers invisibility to ghosts.
For Your Amusement:
On the river fork screen, walk to the sun.
Repeatedly get caught by the cannibals and escape, to see the increasing security they put on the door each time. (There's an achievement in the console version of the Special Edition for doing this 5 times.)
Use the catapult without moving it, so that you sink the Sea Monkey. (Oops.) This will result in different scenes after you finish with LeChuck's ship and at the end of the game.
At the vista point, walk off the eastern edge of the cliff.
Inside the Monkey Head
Leave the village, get in the rowboat, and go back to the monkey head. Use the key in its ear. Walk into the open mouth. Follow the pathway north, across the slender bridge of rock, and off to the east. Follow another bridge of rock off the east of the screen where it says "Walk to cave". Use the head of the navigator. Watch how it turns in your hand, and follow the direction he says. Make sure to walk a little ways into the screen each time to get a correct read on the head, or you might pick the wrong direction. If the layout of the screen gives you a choice between directions, stand where they intersect and see what the head does (it may be different than the direction it pointed when you entered the screen). If in doubt, look at the head, and you'll be told what direction he's facing. You may double back on yourself and find that a screen you just left has changed when you go back to it. Keep at it and eventually you'll come to a promontory overlooking LeChuck's ship. (The game determines when you have succeeded by counting your correct moves; you have to make 6. If you make an incorrect one, it subtracts from the total.)
When you find the ship, talk to the head. Ask him for the necklace. You can either keep whining and whining to "Pretty please with sugar on top", or you can threaten him with "Maybe I'll just take it". Use the necklace. Go down to the ship.
Relax for a moment and enjoy the Ghost Ship Shuffle. Open the door on the west side of the screen and go through. Yikes -- LeChuck! Don't get too close. Use the magnetic compass on the key that's hanging on the wall. Return east and go down the hatch on the deck. Continue east to the hold. Try to pick up one of the chickens and you'll get a feather. Look at the glowing crate. Go back to the crew quarters. Use the ghost feather on the sleeping ghost pirate's feet. Do it again. Pick up the jug o' grog. Return east. Use the key on the locked hatch. Go down. Use the grog on the dish. A rat will come up, drink it, and fall over. Now you can reach the vat of cooking grease behind it. Get some grease. Go back up on deck.
Use the grease on the door on the east side, then open it and go through. Take the ghost tools from the wall. Leave, go back down the hatch, and through the quarters to the hold. Use the tools on the crate. Look at the crate and you will get the root. Go back up on deck and leave the ship. Go off the west side of the screen. Mercifully, the game jump-cuts you back to the cannibal village and doesn't make you navigate the catacombs again. Watch the cutscene. Leave the village, and again, you'll jump-cut back to the place where the ship is.
...Er, where it was. Talk to Bob. Depending on whether or not you "accidentally" sank the Sea Monkey when futzing around with the rock catapult, either Otis, Carla, and Meathook will show up now (if you didn't), or Herman Toothrot (if you did). Talk through all the dialogue and soon you'll be jump-cut back to the Mêlée Island docks with a much lightened inventory.
For Your Amusement:
Wander around underground long enough that when you look at things, you start thinking they're cool instead of creepy.
Use the lines "Have a taste of root beer" and then "I think I'll zap you anyway" on Bob at least once, then watch what happens at the end of the scene. (You monster.)
Last Part: Guybrush Kicks Butt
Head east. You'll be chased back by a ghost pirate. Pick any dialogue option you like; you will automatically use the root beer. Go east. Talk to the ghost pirate here. Again, eventually you will automatically use the root beer. Continue north under the clock. Open the church door. Choose any dialogue option you like to stop the wedding. Work through the dialogue. Talk to LeChuck. You can choose whatever you like (if you choose the root beer-related options, you'll find that the thing has gotten jammed). Relax (?) and watch while LeChuck punches you all around the island.
When you crash-land in the Grog machine at Stan's, notice that a green bottle is knocked loose from the machine. After LeChuck pulls you out, stand up. (Or, you know, just lie there, as you can yet again do while LeChuck patiently stands there and waits for you.) Quickly pick up the bottle and use it on LeChuck. If you don't do it fast enough, he'll hit you again, but you can just try again. (Or even allow him to keep doing it so that you can off him in the location of your choice.)
Instant Replay
Blimp-Cam™
Enjoy the final closeup of Elaine and Guybrush. Depending on whether or not you sank the Sea Monkey, during the ending you'll also get a little scene with either Carla, Otis, and Meathook (if you sank it) or Herman (if you didn't).
Now...
Turn your computer off and go to sleep!
For Your Amusement:
When you arrive back on Mêlée, walk west on the docks instead of east.
For Your Amusement at various times:
Press CTRL + SHIFT + W. (Save first)
Last updated: 9/03/2024