
The Lake and Aqueduct
Get the lamp and turn it on. Go south to the Junction. Notice your faithful Elvish sword, stuck in the rock, but you can't take it just now. Continue south three times to Lake Shore. Turn the lamp off and drop it. Save the game. Enter lake. There are two enemies to watch out for here: a giant roc above the surface, and a giant fish below it. If you see the roc, dive to avoid it; if you see the fish, surface. (It's also possible that you will immediately be killed by either. In that case, restore.) Dive. Underwater, you will see a "small, shiny object", "something sparkling", or "something shiny" in the sand. Take the object. If you don't get it, keep trying. If you run out of air you will automatically return to the surface, but you may need to exit the lake and re-enter it lest you freeze to death from staying in the water too long. (When you see "You are becoming very weak. You had better leave the water before you drown!" you have 2 turns to leave the water or you will die.)
When you have the amulet, surface and go west, then south to Scenic Vista. Get the torch and wait until the indicator over the viewing table reads "II". Touch the table. You'll find yourself in Room 8 from Zork II. Get the can of grue repellent. Wait one turn; you will return to the Scenic Vista. When the indicator reads "III", touch the table again. Damp Passage is a location one south and one east from the Endless Stair at the start of the game. Drop the torch here. Again wait one turn to be returned to the Scenic Vista.
Return north to Western Shore and enter the lake once more. Dive, get the grue repellent can you dropped, and return to the surface. Swim across to the southern shore. Apply repellent to me. Go south, south, and east to the Key Room. Get the key. Raise the manhole cover. Go down to the Aqueduct, then north three times to the Damp Passage. Get the torch that you left here earlier. (Hang on to the empty grue repellent can; in this walkthrough you'll be using it later.) You can return west and south to the Lake Shore for the lamp if you like (nostalgic?), but the torch will last the rest of the game in this walkthrough.
For Your Amusement:
Try to pull the sword from the stone about 10 times.
Get eaten by the roc or the fish. (save first)
At On the Lake or Southern Shore, enter swamp.
Underwater, eat the algae.
Visit Zork I (indicator "I") and Enchanter (indicator "IV"). (save first for Enchanter)
Be at Aqueduct View (southeast of Lake Shore) or on the aqueduct at High Arch when the earthquake happens, somewhere around turn 85-130. (Save first, unless you've already gotten the key and come back around to Aqueduct View. If you're on the aqueduct when the earthquake happens you'll be trapped, and if you're at Aqueduct View but haven't gotten the key yet, you are likely to be eaten by grues if you try to retrace your steps back to the lake from the Key Room, although it is possible to survive the trip by saving and restoring.)
Burn the grue repellent can. (save first)
The Cliff and Land of Shadow
From Damp Passage, go west three times to the Cliff. Get the bread. Go down the rope to Cliff Ledge. Get the chest. Wait at Cliff Ledge for a man to appear at the top of the cliff. Tie the chest to the rope as he asks, and wait again until he reappears. Grab the rope and you will be hauled up the cliff. The man will give you a wooden staff from the chest. Head back down the cliff twice to Cliff Base and go south to the Flathead Ocean. Wait until you see a ship. Type hello sailor (you were waiting for the game where that would do something, weren't you?) and the sailor will throw you a gift. Look, and pick up the vial, and examine it: it's an invisibility potion.
Go east. The Land of Shadow is an area consisting of 8 rooms; you've just arrived in room 7:
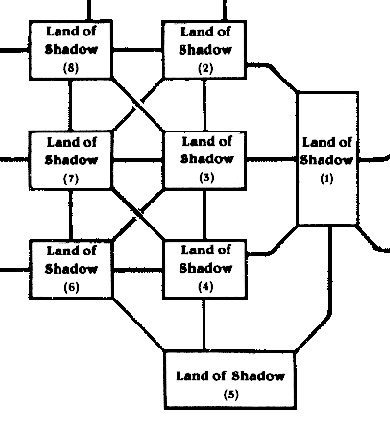
Wander about in the Land of Shadow until you encounter "a cloaked and hooded figure". You can also try just waiting when you "hear quiet footsteps nearby". When you encounter the figure, the Elvish sword will appear in your hand. Attack the figure repeatedly but don't kill it. If you are getting hit a lot, leave the room in a direction that the figure is not blocking and wander around from there until your wounds heal. When the figure is "badly hurt and defenseless", take its hood and cloak. Then find your way east out of the Land of Shadow to the Creepy Crawl.
For Your Amusement:
Say hello to the man, both while still on Cliff Ledge and when he is examining his treasure.
Throw something at the man from the cliff.
Burn the staff and the trees. (save first)
Say "hello sailor" before the ship arrives, or after it leaves.
Enter the quicksand at the south side of the Land of Shadow. (save first)
The Royal Museum
From the Creepy Crawl, go east twice and south once to the Royal Hall. Examine the seal. Go south again to the Great Door. If the earthquake hasn't happened yet, wait here until it does. Go east through the "gaping cleft in the rock" to the Museum Entrance, then north to the Technology Museum. Try to read the plaque. Examine the gold machine. This is a time machine, and the dial displays the current year (948). Push the gold machine south to Museum Entrance. Open the stone door and push the gold machine east into the Jewel Room. Read the plaque there. Dedicated in 777, eh? Turn the dial on the gold machine to 776, then sit on the seat and push the button. (Don't worry about your possessions; you can't carry anything with you through time.)
You are now in the Jewel Room in the year 776. Look. Take the ring. Wait until you hear the guards leave ("You hear, from outside the door, guards marching away..."). Open the door. Go west. Open the wooden door, then go north to the Technology Museum. (The descriptions of the grey and black machines here may be amusing to players of Zork I and Zork II.) Look under the seat (i.e, of the gold machine). Put the ring under the seat. Sit in the gold machine. Turn the dial to 948 (your present), and push the button. Look under the seat and you will retrieve the ring. Stand, open the (wooden) door, and go south. Open the stone door and go east to the Jewel Room. Get all your belongings. Read the plaque again.
For Your Amusement:
Be at the Great Door when the earthquake happens.
Hang around in the Royal Museum and try to catch a glimpse of the robot. (It's annoying, but harmless; it puts things you have moved back into their places, and closes doors you've left open.)
In 776, repeatedly listen to the guards through the door.
Read the plaque in the Technology Museum in 776.
Go to the Museum Entrance and Jewel Room in 777, and listen to the dedication.
The Royal Puzzle
Go west and south to the Royal Puzzle Entrance. Read the note. ("Intrepid adventurers do not fear mere warning notes!") Save the game.
Go down into the Royal Puzzle. Look. The sandstone "walls" are actually the sides of cubical blocks that are light enough for you to push and move (unlike the marble that is mostly the perimeter of the puzzle and a couple of blocks within it). It is essentially a sliding tile puzzle. You need to get the lore book that is hiding under one of the blocks and then maneuver a ladder that is attached to one side of another block into a position that will allow you to climb back out at the place you came in. There are two blocks with ladders, but only one can be positioned correctly. The following sequence of moves will work:
PUSH EAST WALL. S. S. SE. PUSH SOUTH WALL. N. NE. PUSH SOUTH WALL. TAKE BOOK. PUSH SOUTH WALL. E. NE. PUSH WEST WALL. SW. NW. NE. PUSH SOUTH WALL. SW. PUSH EAST WALL. NE. PUSH SOUTH WALL. NW. N. N. N. PUSH EAST WALL. SW. S. SE. NE. N. PUSH WEST WALL. NW. PUSH SOUTH WALL. AGAIN. W. NW. NW. PUSH SOUTH WALL. SE. SE. SE. NE. PUSH WEST WALL. AGAIN. SW. PUSH NORTH WALL. AGAIN. AGAIN. NW. UP. (You may wish to YELL at this point!)
The Mirror Box
From the Royal Puzzle Entrance, go north, west, north, north, west, west, north, east, northeast to the Engravings Room. If no one is there, leave the room and return until "an old and wizened man" appears. Shake the man to wake him, and then give him the bread. Open the secret door and go north twice to the Beam Room. Drop the can of grue repellent to block the beam of light. Go south to the Button Room and press the button. Go north twice to the Hallway. Notice the mirrored panel that has opened. Go north one more time and you will now be inside the mirror box. Save the game.
Read the long description of Inside Mirror carefully. The mahogany panel moves the whole box when you push it, if the passageway is clear. The pine panel swings out if you push it, allowing you to exit the box. The red and yellow panels rotate the box clockwise; the black and white ones rotate it counter-clockwise. The short pole steadies the box while it moves north or south, but prevents it from rotating. The compass rose and T-bar on the long pole indicate the direction the mahogany panel is facing, which is the directon of movement of the box.
Raise the short pole so you can rotate the box. Push the yellow wall twice, so the compass rose now points north. Lower the short pole again. Push the mahogany wall three times. Raise the short pole. Push the white or black walls to rotate the box so the mahogany wall faces south. Push the pine wall and go north to the Dungeon Entrance.
The puzzle here is that you've bypassed the twin Guardians of Zork, who kill anything that comes between them, but can't tell the difference between their twin and their own reflection. You must have the short pole in the channel when you move the box because the Guardians can detect the reflection by the box's wobble if the short pole is not steadying it. (An alternate solution is to drink the invisibility potion from the vial and walk past while invisible.)
For Your Amusement:
Throw something at the Guardians of Zork. (When you first enter the mirror box, raise the short pole, then rotate it so the mahogany wall faces south, and push the pine wall so you can exit to the north before bypassing them. Save first if you choose the book, hood, cloak, staff, key, amulet, or ring, all of which you need to win the game.)
The Dungeon Master
Knock on the door and the dungeon master will answer. Go north, then east or west, then north twice to the Parapet. Look at the sundial. Turn the dial to 4, then press the button. Go south, open the door, and go south into the Prison Cell. Tell the Dungeon Master to go to the Parapet. Tell him to turn the dial to another number (pick any). Tell him to press the button. Unlock the bronze door with the key. Open the bronze door. (What's going on here is that the prison cells are apparently on some kind of rotating "lazy susan", conceptually if not physically. Turning the sundial to a number summons that cell, and that cell is returned to its original position when a different number is pressed. You can only unlock the door while in cell 4 and when that cell is in its original position.)
Go south into the Treasury of Zork. Congratulations, Dungeon Master!
For Your Amusement:
Look into the mirror or knock on the dungeon door while invisible.
Throw something into the flaming pit in the dungeon.
For Your Amusement at various times:
Get eaten by a grue (surely you know how?) - you may run into not merely one grue, but an entire convention!
Repeatedly examine the key.
Drop the lore book, then burn it with the torch. (Due to a scripting bug, this will only work when you are not holding the book.)
Extras
For further entertainment, you may be interested in:
Lists of bugs in Zork III: Nathan Simpson, Graeme Cree, XyzzyNews
Posts about this game at The Digital Antiquarian, The Adventurers Guild, and SPAG
Source code
Points
You earn one point for each of the following actions, for a total of 7 points:
Entering the lake
Touching the viewing table
Arriving at Cliff Ledge
Encountering the hooded figure
Attacking the hooded figure
Pushing the button on the gold machine while the dial is turned to a number other than 948
Pushing a sandstone wall in the Royal Puzzle
You may notice that these points have little to do with actually having solved anything. What's the deal? According to the Invisiclues, "The scoring is a hint as to what is important. The points are not 'earned' by solving puzzles or accruing items. You receive a point when you start on a path where you have a potential for progress in the game. It is possible to have all 7 points without correctly solving any of the puzzles."
Last updated: 6/17/2021